
In Chapter 8 of our previous course, Create a Secure Website dot com, we covered four ways to promote your website. These included
8.1 Create a Home Page Slideshow
https://createasecurewebsite.com/final-steps/8-site-promotion/8-1-create-a-homepage-slideshow
8.2 Create and Post Informational Videos
https://createasecurewebsite.com/final-steps/8-site-promotion/8-2-create-edit-and-post-informational-videos
8.3 Add a Free Email Newsletter
https://createasecurewebsite.com/final-steps/8-site-promotion/8-3-add-a-free-email-newsletter
8.4 Add a Free Downloads Manager
https://createasecurewebsite.com/final-steps/8-site-promotion/8-4-add-a-free-downloads-manager
Here we will provide a summary explaining the important of each of these steps with the hope that it will encourage you to add each of these four features to your online store.
1 Why you should create a Home Page Slideshow
Your online store Home page should include a Welcome article explaining the unique benefits that your online store can offer your website viewers. But the problem with a Welcome article is that many visually oriented website visitors will not read it. Instead of learning from reading text, many site visitors tend to look only at images. This is why it is important to add a Home Page Slideshow to the top of your Online Store Home page. The slideshow can include both unique products you offer, free products, free courses or other benefits of your online store.
Each image for the slideshow can be created as a Libre Draw document. Because we want to use our slideshow show images to create videos for our business video channel, we should change the ratio to 16 by 9 and therefore change the images to 1200 by 675.
We can then resize these images to 800 x 450 to use for our website Home page slideshow. To do this, open a Libre Draw document and click Page Page Properties. Then click on the Page tab and set the format for Landscape 12 wide by 6.75 high.
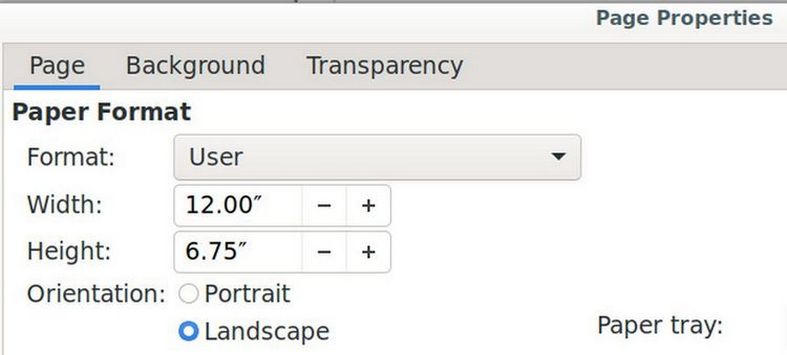
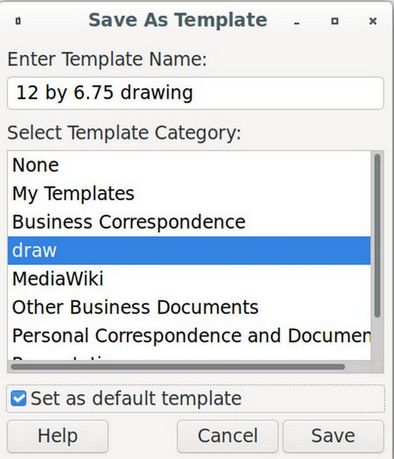
Click on Background and give it a color of #eeeeee. Then click OK. Then click File, Save as Template. Name the template 12 by 6.75 drawing and place it in the draw folder. Then check Set as Default Template and click Save.
Then add your text and images and save the drawing as 01-welcome, 02-next-image to keep the images in order.
Capture Images with Flameshot
Once you are finished placing your images and text boxes in the workspace, use Flameshot to capture each image and place it in a Writer document. Right click and compress each image to 150 DPI. Then create a slideshow images folder. Then right click on each image and click Save As and save the images as 01, 02, 03, etc. making sure that the file size for each image is under 100KB.
Use Gthumb to resize and then crop each image
Start the Gthumb image editor. Select and open the first image. Click Format, Resize.
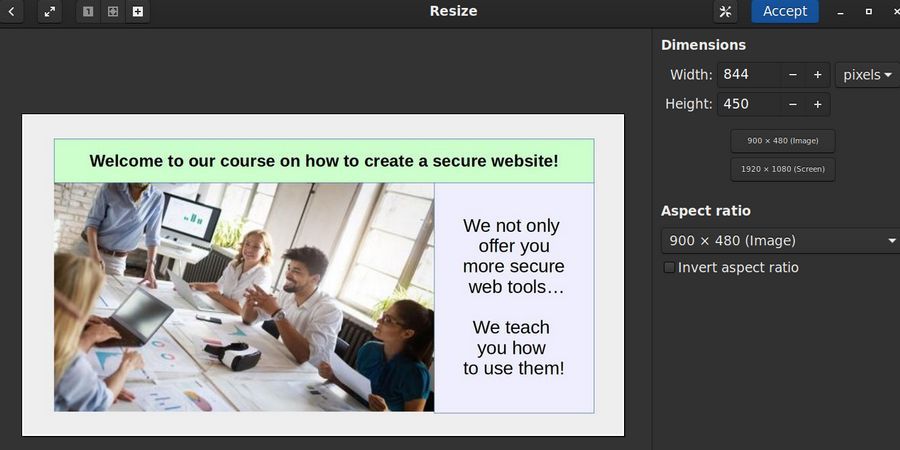
This image is 844 by 450. We want 800 x 450 which is a 16 x 9 ratio. Therefore reduce the height to 450 and click the blue Accept button at the top of the screen. Then crop with the width to 800. Then click Accept. Then save the image as 01-800.jpeg. Then repeat with the remaining images. Your slideshow images folder will now have the original images plus a version of each image set for 800 pixels wide by 450 pixels high (16 x 9 ratio).
Download the DJ Image Slider Extension
Go to the Joomla Extensions Directory Slideshow category. The most popular free slideshow is called DJ Image Slider. Here is the link: https://extensions.joomla.org/extension/photos-a-images/slideshow/dj-imageslider/
Click Download. Then go to System, Install, Extensions to install the Slideshow.
Then click Components, DJ Image Slider categories and click new to create a category called Home Slideshow. Then go to Content, Media to create a slideshow folder and load your slide images.
Add Slides to the Slideshow one at a time
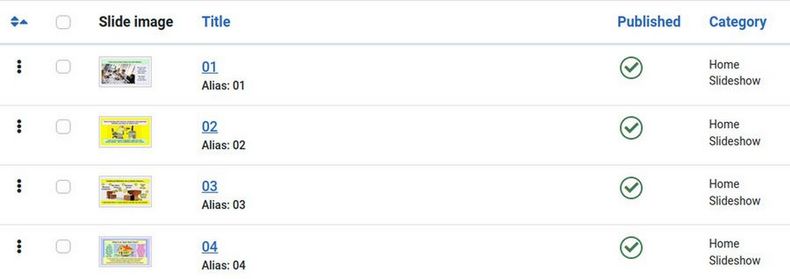
Click Slides. New. For Title, type 01. Then click Select and click on the 01 image to select it. Click Insert. Then click Save and New. Name the second slide 02 and select the second image. Click Save and New to add the remaining slides. Here is what the slide list will look like when we are done:
Configure the Slideshow Module
Go to Templates, Styles and click on the Helix template. Then click Layout and add a new row and module position for the slideshow. Then click Content, Site Modules. Click on the DJ Image Slider module to edit it. Change its name to Home Slideshow and publish it in the Helix Slider position. Turn off Show Title. Change the Slider source to Component. Scroll down to Component as a Source and hide the title and description Then scroll down to Basic Slider Settings and change the slider width to 800 and the height to 450. Change Vertical image centering to Yes and Visible Images to 1. Increase the space between images to 30 pixels. Then click the Menu Assignment tab and change it to Only on selected pages. Click None. Then select the Home page. Then click the Customize Slider tab. Scroll down and change the Slide Transition time to 6000 (6 seconds) meaning that each slide will show for 6 seconds and 10 slides will show in one minute. Then click Save and Close and view the result. Congratulations! You now have a Home Page Slideshow!
2 Create and Post Informational Videos
One of the most effective ways to promote your new online business is to create and post informational videos on a business video channel and then embed those videos on your business website pages. There are huge numbers of people who spend their days watching online videos. These videos combine powerful visual images with audio – which can be a combination of music and spoken words. It is easy to embed your business videos on your business website as well as place links to your videos in the comment sections of popular blogs. Here is an overview of this process:
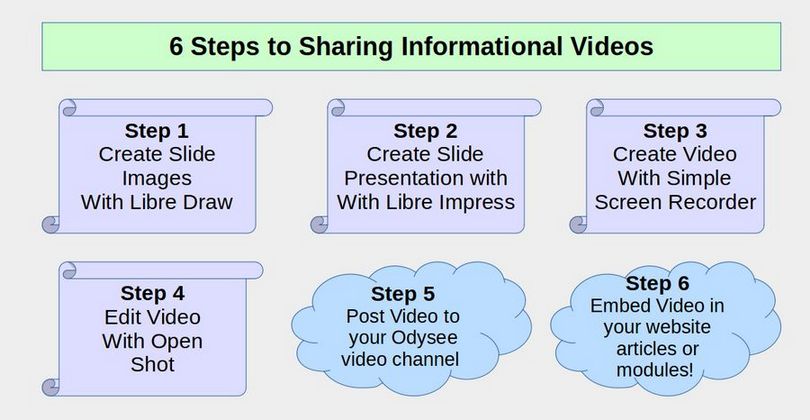
Step 1 Create Slide Images with Libre Draw
Use the 12 wide by 6.75 Libre Draw Template for the Page Format. Then add images and text, then capture the images with Flameshot. Then precisely resize and crop the images with Gthumb.
Step 2 Create a Slide Presentation with Libre Impress
Create a Libre Impress Slideshow with a ratio of 16 by 9 using a Slide Property of 8 inches wide by 4.5 inches high. We will use this slideshow for our video presentation. But we will add a more interesting slide transition to go from slide to slide during our video. Open the Impress Presentation file. Then click Slide, Slide Transition. Click Cube. Then click Edit, Select All. Then click Apply to All Slides. Then click File Save. Then close the Transitions panel and close the side bar. Click Slideshow, Start from First Slide to view the result.
You generally want 20 or fewer slides which will allow you to have a video presentation that is less than 10 minutes in length with about 30 seconds to show and discuss each slide. The final slide should show a link to your business website and encourage those who watch the video to go to your website for more information.
Step 3 Record your Video with Simple Screen Recorder
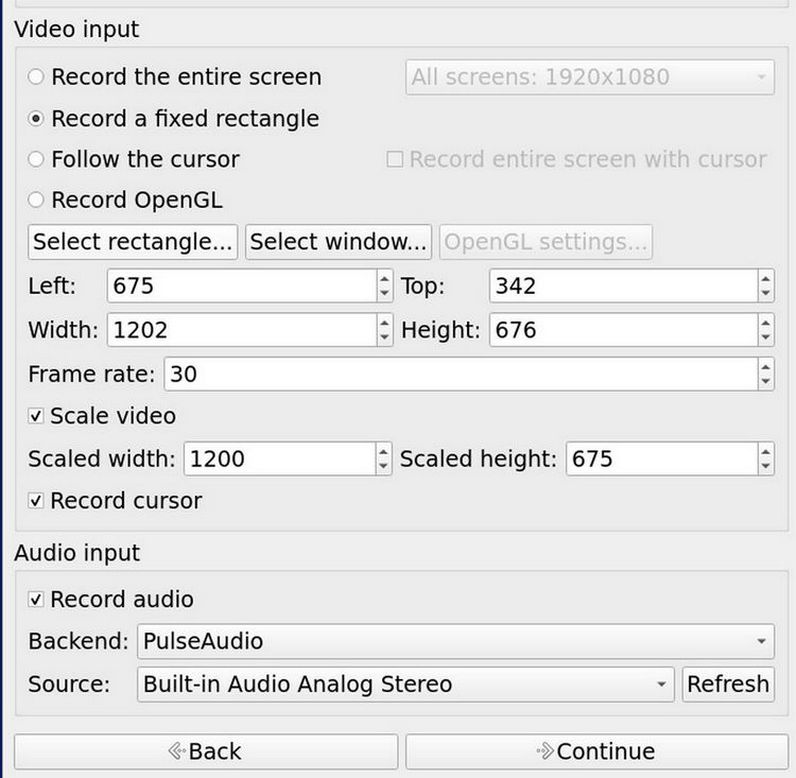
Now that we have our slide presentation, we will use a free tool called Simple Screen Recorder to turn your presentation into a video. Add Simple Screen Recorder by going to the Debian Software Center and typing Simple Screen Recorder in the Search Box. Then click Install and enter your password. To open Simple Screen Recorder, from the Debian Start Menu, click on Sound and Video, then click Simple Screen Recorder which will bring up a Start screen. Click Continue at the bottom of the screen. This will bring up the second screen:
Open your Impress Presentation and put it in the lower right corner. Click Slide Show, Slide Show Settings and change the Presentation Mode from Full Screen to In a Window. Then click OK. Then click Slideshow, Start from First Slide.
Then change Simple Screen Recorder setting. Click Select Rectangle and select a rectangle around the presentation. Resize the presentation to make the width about 1200. Click Scale Video to make it exactly 1200 by 675. Then click Continue at the bottom of the screen. Give your first test video a file name. Make sure the container is set for MP4 and the Audio is set for MP3. Then click Continue at the bottom of the page.
If you want, you can place some Teleprompter text in the space above the slideshow to read from a prepared script. You can do this with a Libre Writer document. It helps if you have typed out what you want to say so that you only need to read your text as you display your images. For example, for the first slide, you might say: Welcome to our video channel….. The reason we start this channel is to show you how you can create your own secure website using free open source tools...
With the teleprompter text above the Libre Impress panel, here is what your Desktop screen should look like:
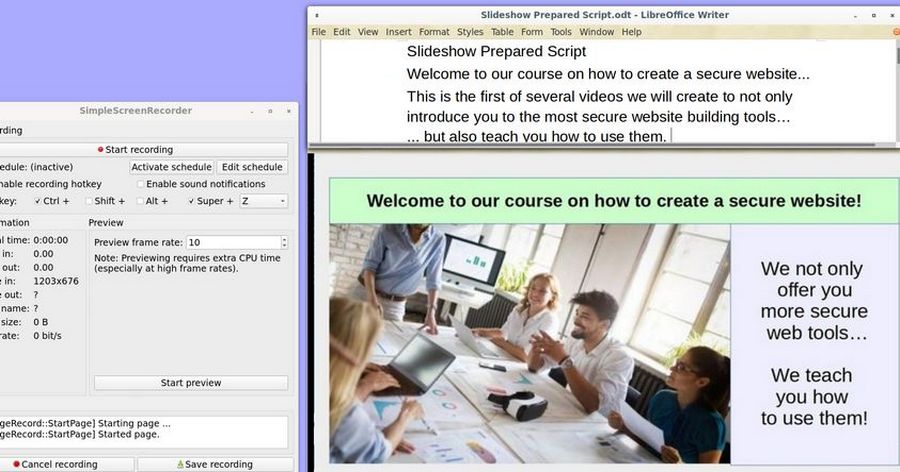
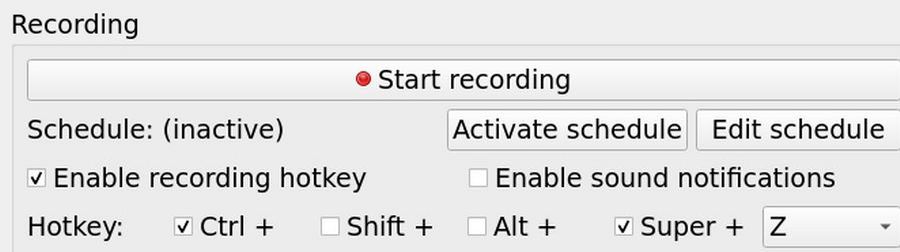
You can advance the slides by clicking on the screen or by clicking on the right arrow on your keyboard. To start the recording, click on the Start Recording button. Say a few words about each slide. Give each slide about two to three sentences which is about 20 to 30 seconds. Then click on the screen to move to your second slide. When you are done recording, click on Save Recording on your keyboard to stop the video.
Next, before posting your video, you should review it. Open your file manager, find your video file, then right click and click Open with the default video player. It is common to record your video several times to improve the volume level of the recording and the pacing of the recording. If the sound quality is not good, consider getting a headset with a microphone and using that to record your videos.
Step 4 Edit your Video with Open Shot
Open Shot is a free simple open source video editor. You can download it from the Debian Software Center. You can then find Open Shot in the Sound and Video section of your Applications. When you open Open Shot, it will ask if you want to create a desktop file. Click No.
How to use Open Shot to Edit your Video
We will use Open Shot to add a second audio track with background music to our video. Click File Import Files. Then in your File Manager, find the video you just created and import it. Then click File, Import Files again and find the audio file you want to use and import it. Then click File, Save Project As and name the Project Welcome to our website.
Then right click on the video and click Add to Timeline. Default location is Track 5. Click OK. Then right click on the audio file and click Add to Timeline. Change the location to Track 4. Then click OK. Then on right side of the Timeline row, change the time from 15 seconds to 60 seconds.
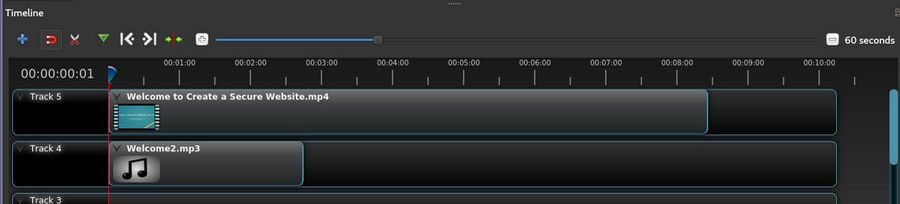
The video file is 8.5 minutes long. But the audio file is only 2.75 minute long. Therefore, move the red line to the end of the audio clip and add a second copy of the audio clip. Repeat moving the red line and adding copies until the audio on Track 4 extends past the video.
Reduce the Audio Volume
Play the combined video plus Audio by clicking on the play button. The audio on Track 4 is likely to be much louder than your voice from the video on Track 5. Click on the first audio file in Track 4 to select it. Then right click and click Volume, Entire Clip, Level 10%. Repeat for the other audio tracks. Then play the combined video again. Once the sound level is set Save the project.
If you need to edit out any part of the video, click on the scissors and place it on the timeline where you want to make the cut. Click and it will turn the video into two parts. Right click on the part you want to delete and click Delete. Then click File, Export Project, Export Video. Name the file, Finished Video 01. Use the default settings and click Export Video. Leave all of the settings at their default values. Change the file name so it is different from the Imported file name. Then click Export Video and test it.
Step 5 Create Your Business Video Channel
Once you have a business video you like, you are ready to create your own video channel and post your video to your channel. In the past, we have used YouTube for video hosting. However, YouTube extreme censorship policies as well as their data mining practices led us to seek out a platform that is more respectful of your rights and the rights of your viewers. Therefore, we now recommend a video hosting platform called Rumble. Just go to this link: https://rumble.com/
Then in the upper right corner, click Sign In. Then click Create a Rumble Account. Use your real name and create an account password. Your account name is different from the name of your Video Channel. In fact, you can have several video channels under the same account name. In the referrer box, feel free to type in davidspring. One your account has been confirmed, log in and click on Account Overview. Then scroll down and click Create a Channel:
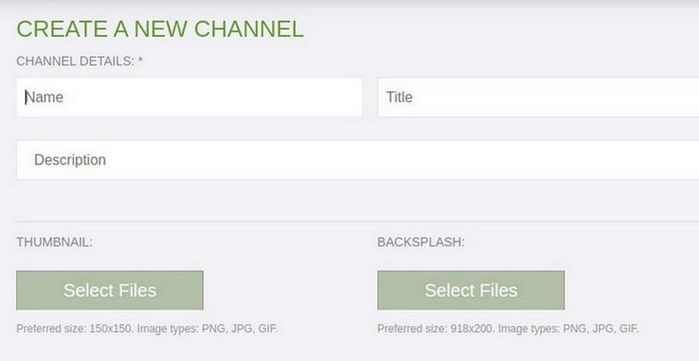
For name, enter the name of the channel with no spaced. The name you choose here will determine your URL. If you name your channel "MyRumbleChannel" your channel's link will be "Rumble.com/MyRumbleChannel".
For Title, use the same name but with spaces between the words. For example, if your title is "My Rumble Channel" then other users will see My Rumble Channel. The Thumbnail image should be 150 x 150. The back splash should be 918 x 200. Here is our back splash image (taken from our website header image). Then click Create.
Post your Business Video to your video channel
In the upper right corner, click on the video add button. Then click on the up arrow to find and load your video. While the video is loading, type the title into the Video Info box. Then type a short description. The thumbnail images will be generated from the video. You can also click on Choose your own to upload your own thumbnail image. Scroll down to add tags such as science, education, linux, joomla, website. Then in the Upload to box, choose the channel you want to post this video on. Wait for the video to finish loading. Then edit the video to add a custom thumbnail image.
Add your Video to a Joomla Article or Module
To add a video to a Joomla article or module, open the Rumble video and click on Embed. There are two options. The first is JavaScript which we do not want. The second is Embed IFRAME URL. Copy the iframe URL to your clipboard. Then paste the embed URL into your Joomla article or module by inserting it into the following:
<p><iframe src="/https://rumble.com/embed/vw2172/?pub=4" width="640" height="360" style="width: 640px; height: 360px;" allowfullscreen="allowfullscreen"></iframe></p>
Then go to the web page and verify that the video plays properly.
3 Add a Free Email Newsletter
Sending email newsletters to folks on your website email list is one of the best ways to keep your community up to date on your latest events. The goal of every newsletter should be a call to action such as clicking on a READ MORE button that goes to a web page with more information. One option for sending newsletters is to use an email sending service like Mail Chimp. However, there are several drawbacks to using these services. The real drawback is that you are giving your customers data to a third party service. It is much more secure to use a free Joomla email tool and send the emails directly from your own website. We therefore recommend installing and using a free Joomla 4 newsletter tool called BwPostman. Here is a link to the steps to install and use this important tool:
https://createasecurewebsite.com/final-steps/8-site-promotion/8-3-add-a-free-email-newsletter
4 Add a Free Download Manager
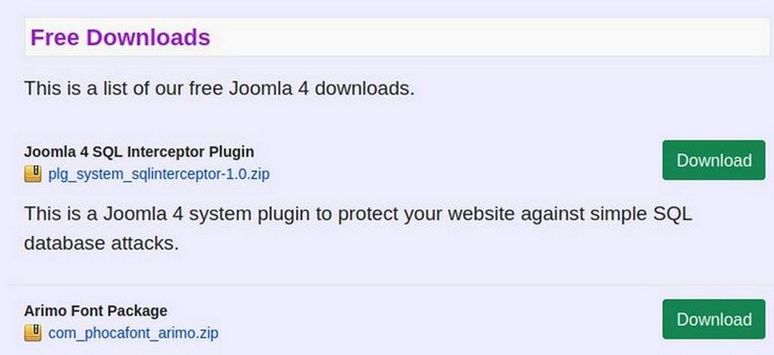
We are living in a knowledge based economy. Word can spread quickly if you are offering important information for download on your website. One way to increase traffic to your website is to offer your visitors the ability to download informative documents. They can then read these documents when they are not online and even print them out to read when they are not on their computer. A download manager also gives you the ability to offer virtual products such as PDF slide shows and PDF tutorials to your readers. In this article, we will show you how to create a well organized Download Manager to help you display and track these download files.
Downloads can be offered on three kinds of pages – those open to the public, those open only to registered users and those pages only open to registered users who have paid a fee and joined a subscription based club. Even if you offer document downloads to your customers for free, you will still want to track how many times each document has been downloaded and where these special documents are on your website. One of the best download managers is Phoca Download. It is easy to set up and easy for customers to use. It has a nice appearance which can be customized for your site.
What’s Next?
Phoca Cart also has the ability to add and give away or sell downloads . If you have already set up a Phoca Cart online store Phoca Download may be unnecessary. We will therefore review how to set up Free Downloads inside of Phoca Cart in our next article.