
A forum is a place where members and customers can ask question which are organized by topic. Forums are useful not merely for educational or social websites, but also for stores offering products and services. In this chapter, we will show you how to add a free forum creation tool called Kunena forum to your website. More than 4 million business websites now use Kunena forum – making it one of the most popular tools in the Joomla Extension Directory.
The Importance of Organizing Questions by Topic
A community forum is one of the most important ways to create a more interactive website. Unlike a blog which is organized more by date than by topic, a forum is a way to organize questions on a particular topic. A forum allows members of a community to post their own TOPICS, also called threads, which can be anything from questions and comments to entire articles and links to websites and videos. Other members of the community can then respond to the topic with further questions or comments. The Forum discussion is organized by placing Topics within Categories much like Joomla articles are organized into categories. Within the categories are the actual topics or questions. Other common aspects of forums includes a “Profile” page where users can download an image of themselves and provide basic information about their background and interests.
Why Kunena Forum?
Choosing a Forum component is an important decision for any website manager. A forum is not only an important way for registered website members to ask questions, but also an efficient way for other viewers of your website to learn from the questions of others and see how well those questions have been answered. In short, an easy to read and easy to use forum can inspire confidence in your viewers. The biggest problem with Kunena Forum is its complexity. We will therefore try to overcome the complexity of Kunena by providing this detailed set of instructions on how to set up, simplify and manage Kunena as well as a series of tips for improving the appearance of Kunena.
Kunena has several important advantages. First, it is integrated with the Joomla database. This means existing Joomla members are already Kunena Forum members. There is no need to create a separate account just to post to the forum. Second, Kunena comes in over 40 languages. Third, Kunena comes with several security features not found on other forums. Fourth, Kunena offers the ability to moderate posts before they are published on your forum.
In order to make the process of learning Kunena a little easier, we have broken down the process of building a Kunena forum into 7 steps.
#1...Review and Install Kunena
#2...Review Kunena Sample Forum Terms and Structure
#3...Customize Configuration Settings
#4...Create our own Categories
#5... Customize the Kunena Forum Menu
#6... Customize the Appearance of your Forum
#7… Manage your Forum
Let’s take a look at each of these seven steps.
Step #1... View Demo and Install Kunena
To see what Kunena Forum looks like, here is a direct link to the official Kunena Forum.
https://www.kunena.org/forum/index
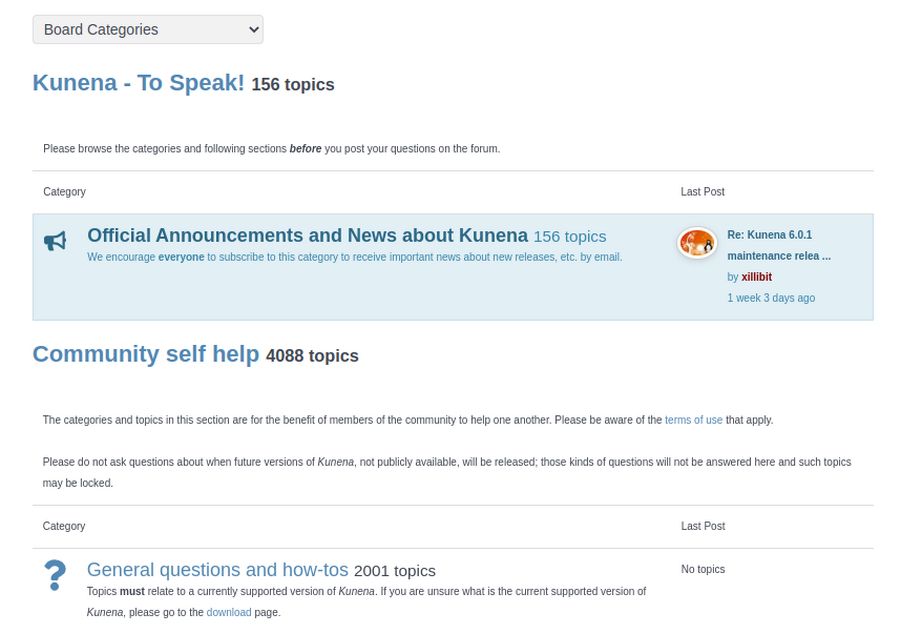
Click on the Board Categories Drop Down arrow to see how the official forum is divided into several categories:
Forum Structure
At the top is the name of the first top level section (Kunena – To Speak). This top level section includes a single sentence. Note that there are no dashes before the name of this section. Also there are no actual Topics inside of this section. Inside this section is a single category called Official Announcements – which has all 156 topics. The Announcements area can be used to place important info and or Joomla modules which will appear on every forum page.
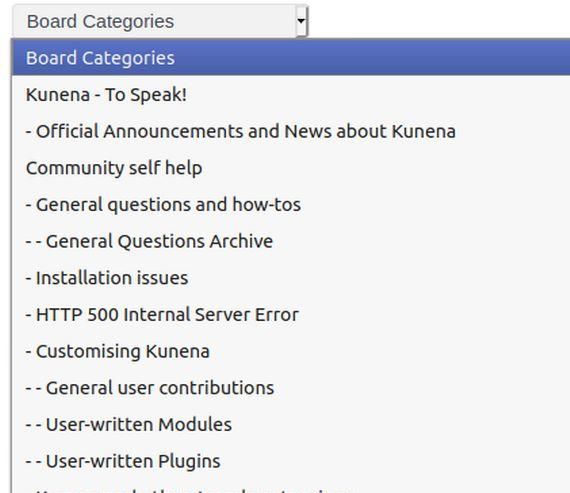
The next top level section is called Community Self Help. It has a couple of sentences to explain what this section is about. But it has no actual topics. Inside of the Community Self-Help section are four categories. These are General Questions and How Tos, Installation Issues, HTTP 500 Errors and Customizing Kunena. Inside of the Customizing Kunena Category are three sub-categories: General User Contributions, User Written Modules and User Plugins. Here is what Community Self Help forum sub-categories look like:
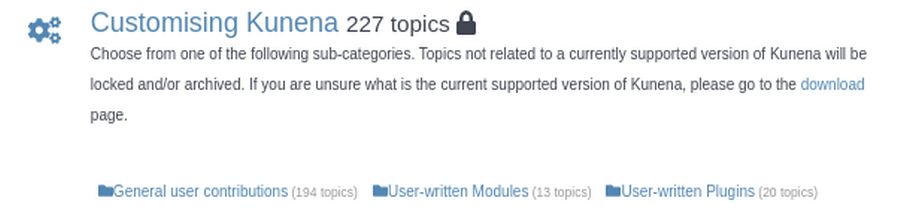
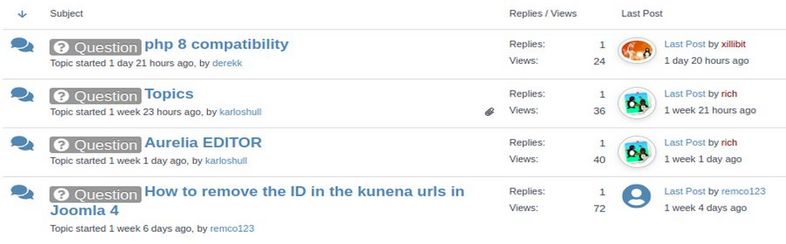
Each Kunena Section can have several categories. But sections do not have topics. Each Kunena category must be assigned to a section parent. Categories can have an infinite number of Topics. To see the list of Topics, you need to click on the category that the topic has been placed in. Here is what the List of Topics looks like in the General Questions Category:
Download Kunena version 6
Now that we have a rough idea of Kunena Forum terminology, let's download Kunena. Click Downloads in the top menu. Then in Download Kunena 6, on the Kunena Forum Package Line, click Download. Then transfer this package from your Downloads folder to your website Extensions folder. To install Kunena, log into your Joomla Control Panel and go to System, Install, Extensions. Then upload the package. When the installation is finished, it will ask to Install Kunena Sample Data. We will skip this step and build our own forum structure instead. Next, click Install to install Kunena Menus. Then click Restore Kunena Menu. This may end on a Tools screen. We will skip these tools for now. Instead, click Components, Kunena Dashboard and scroll to the bottom.
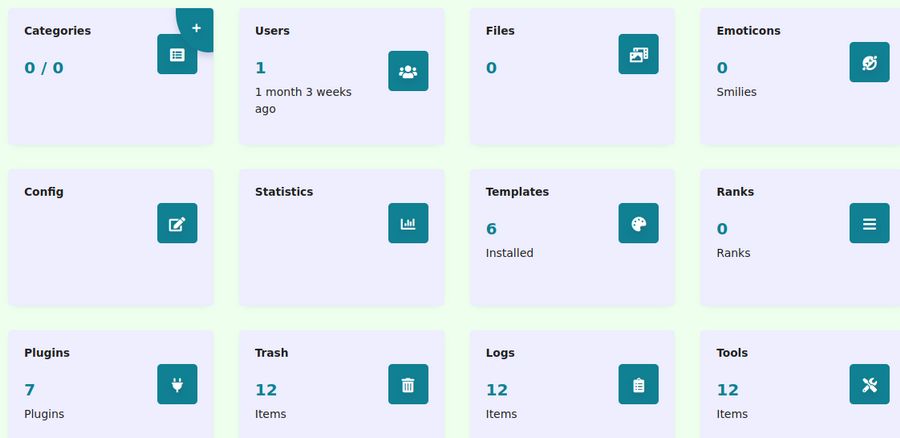
Kunena has a well organized Control Panel Forum Administrators can use to control every aspect of the forum’s structure and appearance.
Step # 2...Review Kunena Sample Forum Structure.
When we installed Kunena, not only did we get a Kunena Forum Control Panel in the Components section, but Kunena also created a new Kunena Menu in the Menus section of our control panel. Click on Menus, Kunena Menu to open it.
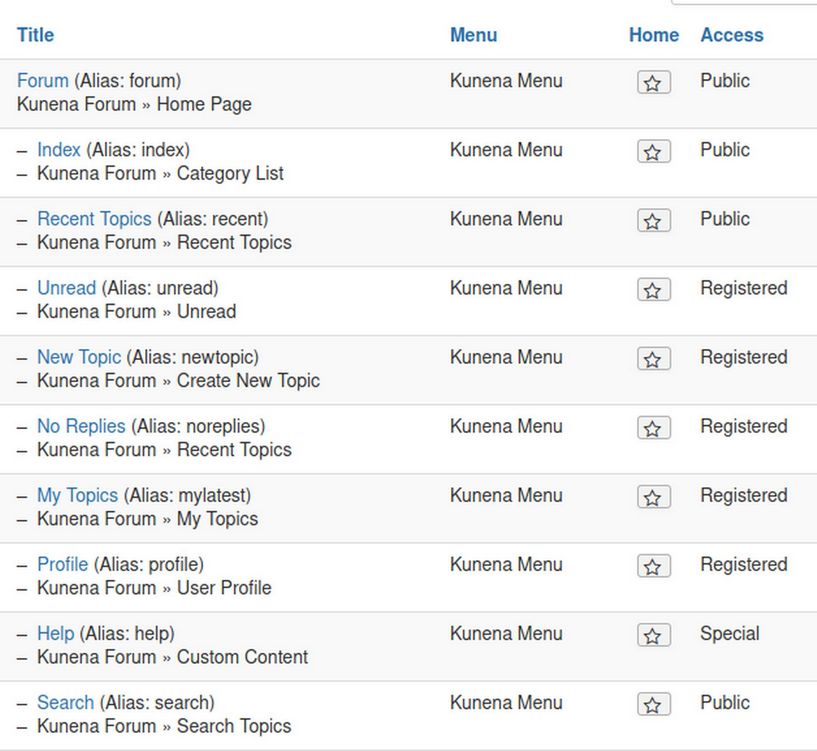
There is a top level menu item called Forum which has 9 submenu or child menu items. Only three of these menu items can be viewed by the public. Five more can be viewed by registered users. To see this new menu, we need to publish a menu item for Kunena forum in our Joomla main menu.
Create a Menu item for Kunena Forum in our Main Menu
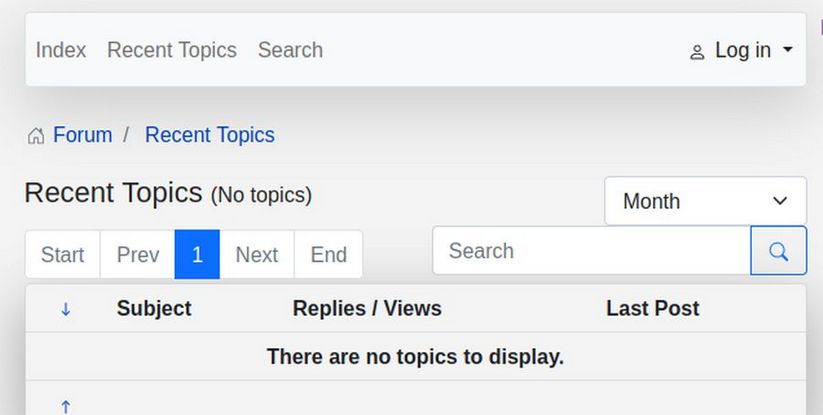
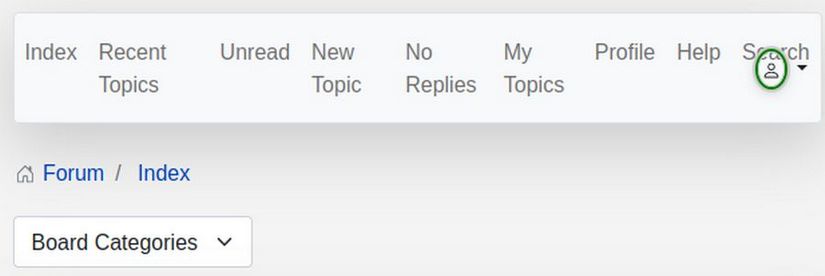
We will now publish the Forum Menu Item so we can take a closer look at the pre-loaded example forum provided by Kunena. To view the Kunena initial “sample” structure, we first need to publish the FORUM Menu Item link which Kunena has already created on our Main Menu. In the Joomla Administration Top Menu, click on MENUS > Main Menu. Then scroll to the bottom of the main menu and you will see a new menu item called Forum. Click on the check box to the left of the word Forum, then click on Publish. Then view the front end of your website. Then click on the Forum Menu Item to bring up Kunena Forum which opens on the Recent Topics page.
Sadly, the Log in Kunena Menu Item does not work so we will replace it with a different log in menu item in a moment. For now, click on Index to go to the real Forum Home page:
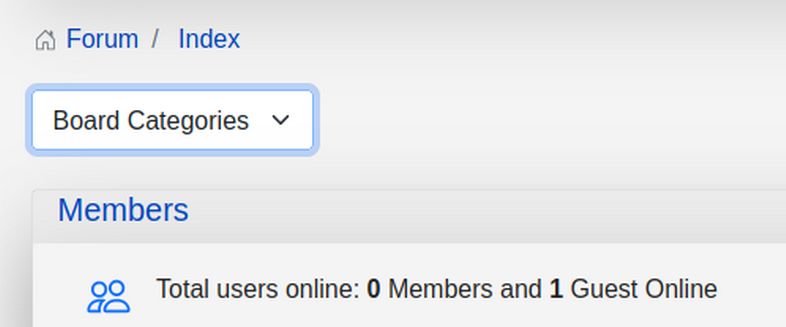
There are no board categories. We will create some in a minute.
Change the Main Menu Forum Menu Item to Index
We want the Forum menu item to open on the Index rather than the Recent Topics page. To change this so the Forum opens on the Index page, go to Menus, Main Menu and click on the Forum menu item to edit it. Then for Menu Item, click Edit. This brings up a popup screen with several Default Menu Item options:
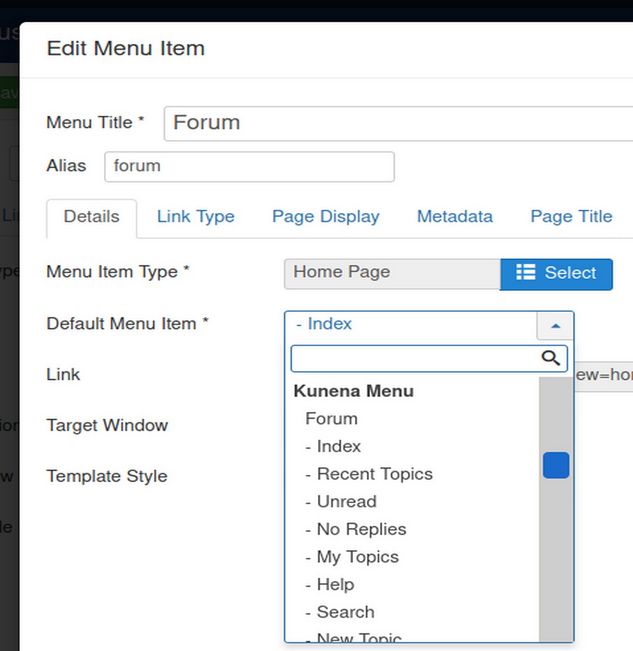
Click on the Index option. Then click Save and Close to close the popup. Also change the Menu Title from Forum to Community Forum. Then click Save and Close. Then go to Site Modules and publish your Log In module in the bottom1 module position of your Contact Us or About Us page. Then go to the Front end and log in. Click on the Community Forum menu item.
Logged in users can post new topics and add a Profile Image. But first we need to create a Top Level Section and add some categories to the section.
Step #3 Customize Configuration Settings
Before we add our Forum categories. we should make a few changes to the Kunena Configuration Settings. Go to Kunena Configurations to change and or hide the following:
General Tab:
Change Forum Title from Kunena to Our Community Forum
Change Enable RSS Feeds from Yes to No.
Change Display Page Creation Time from yes to no.
Front End Tab:
Change Show Announcement from Yes to No.
Change Show Moderators from Yes to No.
Change Message Reporting from Yes to No.
Users Tab:
Change User Statistics and Karma from Yes to No.
Change Allow Favorites from Yes to No.
Change User Status from Yes to No.
Change Personal from Yes to No.
Change Signatures from Yes to No.
Change Social from Yes to No.
Security Tab:
Change Guests see user list and profiles from Yes to No.
Change moderate new users from 0 to 2.
Change guests to see stats from Yes to No.
Change image minimum posts from 10 to 1.
Ranking tab: Change ranking from Yes to No
Extra tab:
Userlist Settings: Change from Yes to No: Online status, number of posts. Karma, join date, last visit date. profile hits
Statistical Settings: Change all from yes to no.
Poll Settings: Change from Yes to No.
Then click Save and Close.
Step #4 Create your Forum Categories
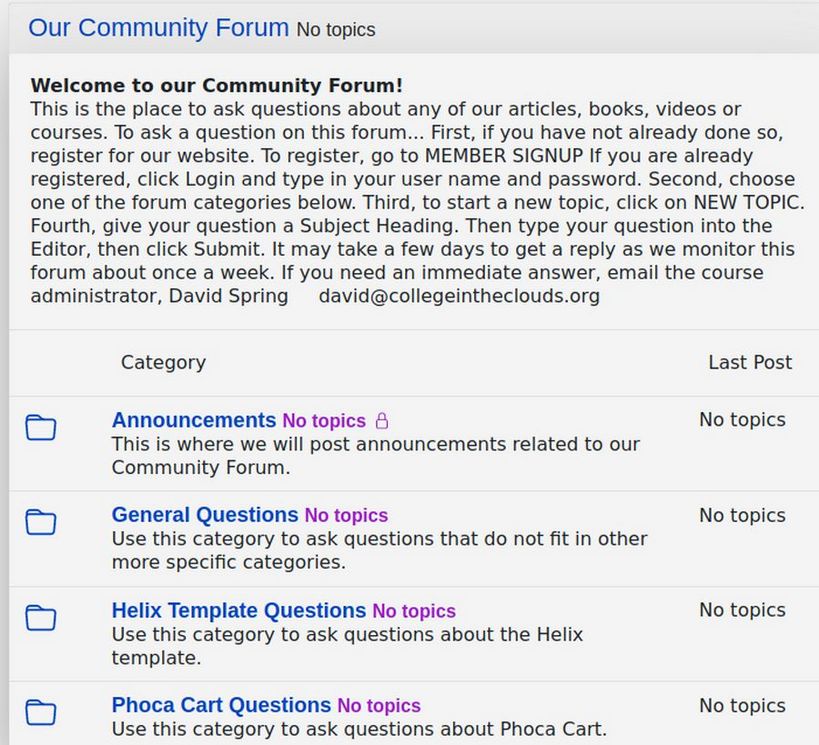
It will be easier for readers to understand the structure of your Forum and the structure of your website if they are similar. One option is to make the forum categories identical to your website categories. Another option is to create a single forum for all of our courses and then use each course as its own category. A third option, we will use here is a single section with three categories called General Questions, Helix Template Questions and Phoca Cart Questions. To create these categories, go to Kunena, Categories and click New. Before we can create our three Categories, we need to create the top level Section. We will call this Section Our Community Forum:
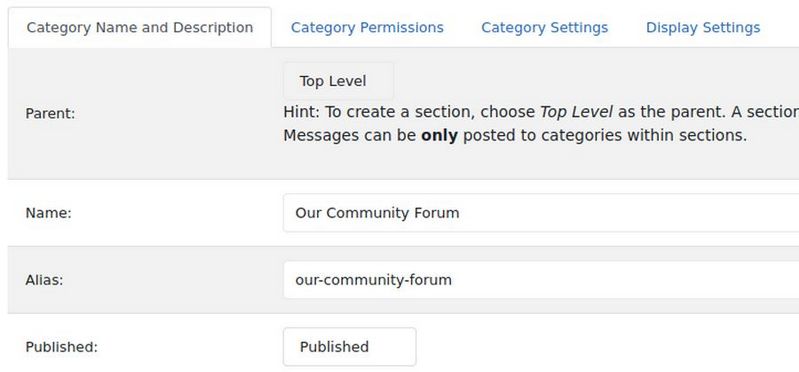
A Section has no parent. You simply give it a name. Then scroll down the page where you can add a Description and a Category Header. The Description is the main description for the Section. The Section Header is used to display additional information about the Categories of Topics the Section contains. Here is our description of our forum:
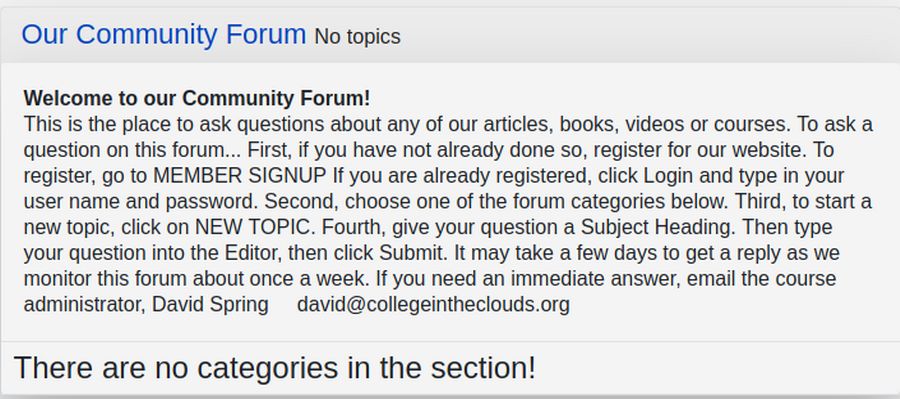
[b]Welcome to our Community Forum! [/b]
This is the place to ask questions about any of our articles, books, videos or courses. To ask a question on this forum... First, if you have not already done so, register for our website. To register, go to MEMBER SIGNUP If you are already registered, click Login and type in your user name and password. Second, choose one of the forum categories below. Third, to start a new topic, click on NEW TOPIC. Fourth, give your question a Subject Heading. Then type your question into the Editor, then click Submit. It may take a few days to get a reply as we monitor this forum about once a week. If you need an immediate answer, email the course administrator, David Spring
Here is the Category Header for our Forum Section: This is our main forum section. It serves as a container for categories which in turn are containers for our topics. This section header box is used to display additional information about the categories it contains.
Then click Save and Close. Then view the result in the front end:
Note: The Section Header only displays when you click on the Section. If you click on Member Forum or Index, then just the Section Description is displayed.
Create Categories
Before you can post or create a new topic you must first choose a category for your new topic or question. When a new discussion topic is created by you or by a viewer, it can be assigned to any existing category by clicking on the category the creator of the post wants the thread to be placed under. But it is up to you as the Administrator to create the actual categories that topics are assigned to.
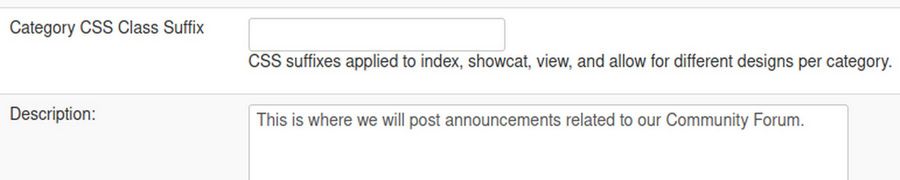
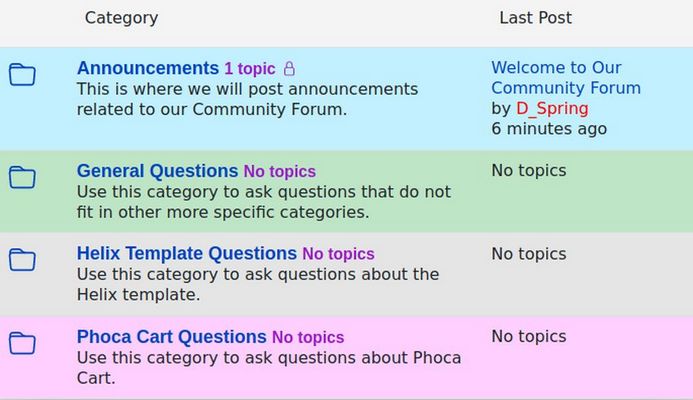
Create a first Category called Announcements.
To create a new Category, click New Category. Change the Parent to Our Community Network. Name it Announcements and type announcement for the alias. For Description, type: This is where we will post announcements related to our Community Forum.
Then click on the Category Settings and change Locked from No to Yes. This will prevent anyone but administrators from posting to the Announcements category. Then click Save and Close or Save and New. Call the second category General Questions. Change the Parent to Our Community Forum. For Name, type General Questions and for alias type general-questions. Then publish it. Then scroll down and add the Category Description. Then click Save and Close or Save and New. Repeat to create Categories for Helix Template Questions and Phoca Cart Questions. Then view the result:
What is a Category Header?
The Category Header only appears on the page for the category it describes. Note that there is a Category description above this Category Header. Because category headers can create confusion, we will not use them on our forum. If you do not want the category header to appear, then simply leave the category header box empty.
Add your First New Topic
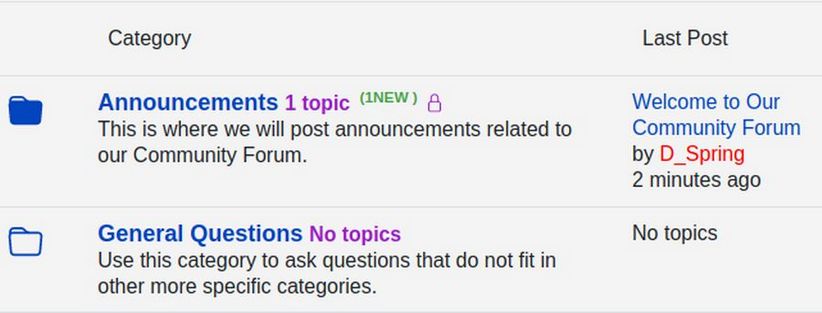
Now that we have added our forum categories, our next task is to create a Welcome to Our Community Forum topic. Log into the front end of your website as a Super User. Then click on Community Forum. Then click on the Announcement category. Then click on NEW TOPIC.
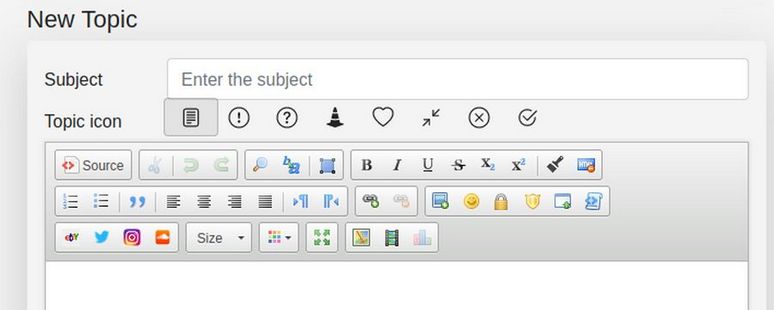
For Subject, type Welcome to Our Community Forum. For Message, type or copy paste: Welcome to our community forum! Asking us questions helps us improve our documentation and helps others who may have the same questions you have but may be afraid to ask. Before asking a question, please scroll through the forum to make sure that your question has not already be asked and answered. Be aware that we are volunteers and it make take a week or more for us to answer your questions. If you need an answer right away, please email us or fill out our Contact Us form.
Then click Submit. If you are logged in as the moderator of the forum, your new topic will immediately appear in the forum.
Step #5... Customize the Kunena Forum Menu...Hide Some Kunena Menu Items
The next step is to hide confusing and un-needed Kunena menu items. Go to Menus, Kunena and select and unpublish the following menu items; Recent Topics, No Replies, My Topics, Help and Search. Also hide the Kunena Log in Menu item. This is not listed in the Kunena Menu, but it is shown to non-logged in visitors and sadly, it does not work. To hide it, add the following to your custom.css:
#klogin-desktop.dropdown-toggle {display: none;}
Add a Forum Log Out Menu Item to the Kunena Menu
We should add a Member Logout link to the Kunena Menu. Go to Menus, Kunena Menu and click New. Then click Select. Then click Users, Logout. Make it a child of the Forum Menu Item. Also set the Access Level for Registered. Then click Save and Close. Here is what our Forum Menu now looks like when logged in:
Add a Member Signup Menu Item to the Main Menu
Click Menus, Main Menu, New. Then click SELECT Users, Registration Form. For Title, type Member Signup. Then click Save and Close.
Add a Member Login Menu Item to the Main Menu
Click New. Then click SELECT and select Users Login Form. For Title, type Member Login. Then click Save and Close.
Step #6... Customize the Appearance of your Forum… Use Kunena Preset Colored Categories
Kunena Forum has a built in ability to color individual categories one of five preset colors. This allows you to have different colors for different categories. Go to COMPONENTS > Kunena > Categories. Click on the category you want to color to open it. Then scroll to just above the Category Description box:
In the box called Category CSS Class Suffix, add one of these six class suffix: -blue -yellow -grey -red -pink -green
It is important to include the dash (with no spaces) just before typing in the color. Then click save. Note that color coding is not possible on the SECTIONS. So only make these changes on the CATEGORIES. When we are done, our Forum Home Page now looks like this:
Step #7 Manage your Forum
There are three main tasks you will need to do to manage your forum.
#1... Define permissions for what different groups of users are allowed to do.
#2... Write posts and Replies to the Forum
#3... Moderate the Posts of your Members. This includes Preview, Approve and Assign Posts that have been written by others.
Here, we will cover the first two tasks. Then in a later article, we will cover how to Moderate Member Posts.
#1... Define Permissions for Kunena Categories with Joomla User Groups
As a moderator and administrator of your forum, it is important to understand the different privileges given to different forum user groups which in turn are related to privileges granted to their associated Joomla User group.
The most common forum set up is to allow the public (all viewers) to read our forum, but only allow “registered users” to post comments, questions and start new topics. These new posts may or may not be reviewed by a Category Moderator. Category Moderators are appointed to the categories by a super user who is also a Global Moderator in that they can moderate posts in every category.
However, this is not the only possible option. You can have some categories that guests do not see... only registered users and moderators see them. You can have other categories that not even registered users see... only moderators see them. You can have categories that guests and registered users see, but that neither group can post to. To define these various levels of privileges, you need to have a clear understanding of both Joomla User Groups and Kunena Forum User groups – because Kunena Forum uses BOTH sets of groups. Let’s look at the Joomla User groups first.
Joomla User Groups
In the Joomla Dashboard, click USERS, GROUPS. There you will see that Joomla divides site visitors into 9 official user groups. Joomla has six front end user groups (or groups that only have access to the front end of the website). These are Public, Guest, Registered, Author, Editor and Publisher. Joomla also has three back end user groups (or groups which also have access to various parts of the back end of the website). These are Manager, Administrator and Super User. As the Super Administrator of the website, you can assign any registered user to any group you wish. Assigning a person to a group gives them privileges – some of which are defined below.
Joomla Front End User Groups
Guests: These are viewers who have not registered on your website. They typically can view forums, but they do not have any privileges. Although it is possible to allow unregistered users to post questions and comments, it is generally not a good idea as spammers often use this weakness to attack and possibly shut down your website.
Registered Users: The Registered User Group comprises those users who have completed the registration process. A crucial part of this process is proving that they are human by requiring that they fill out a CAPTCHA form. Once a person registers, they can log in to the website, view all Content that is set as Registered Access as well as all Public Access Content. By default Registered Users are able to configure their own User Profile in both Joomla and Kunena,
Author: A Registered User can be added to the Author User Group by the Super User. The Author Group inherits the access permissions of the Registered User Group and in addition, its members are allowed to create new Content Items (or Articles) in the Front-end of the web site. This group submits new content - but they cannot directly publish any content. When content is submitted by an Author level user, they receive the message, “Thanks for your submission. Your submission will now be reviewed before being posted to the site.” They can edit only their own articles but only after that article has been published and is visible.
Editor: A Registered User can be added to the Editor User Group by the Super User. The Editor User Group inherits the access permissions of the Author User Group and, in addition, its members are allowed to edit all published Content Items for the Front-end of the website, and to review and edit (where appropriate) any new Content Item that has yet to be published. Still, Editors cannot, publish any articles, not even their own.
Publisher: A Registered User can be added to the Publisher User Group by the Super User. The Publisher User Group inherits the access permissions of the Editor User Group, and in addition, its members are allowed to publish new Content Items to the Front-end of the website.
Three Joomla Back End Groups
Manager: Managers are the same as Publishers, but with Backend access, just like Administrators and Super Users. But their access is limited to the content management areas of the back end. They can access the Article Manager to edit any content, access the Category Manager add, delete and edit Categories, access the Media Manager to add or delete images, access the Featured Articles Manager to edit which articles appear on the HOME page and access the Menu Manager to create new menu items. But they cannot access the User Manager, Extensions, Modules or Plugins.
Administrator: This group allows access to most administration functions. An Administrator has all the privileges on the back end of a Manager, but they also have access to install/delete components, modules and plug ins. They also have User Manager access. What Administrators cannot do is change, edit or install Site Templates or make any changes to the sites Global configuration options. When an Administrator accesses the User Manager list, they will see all users at their access level or below. In other words, they can modify any user EXCEPT a Super Administrator. Also, they cannot create additional Super Users, only a Super User can do that.
Super User: This group allows access to all administration functions. Only another Super User can create or edit a Super User account. Full access to ALL AREAS is given to Super Users.
Three Places to Define Kunena User Groups & Forum Privileges
One of the best parts of Kunena Forums is that you can have different sets of privileges for each different category. But this flexibility can cause confusion for beginning forum administrators. We will therefore review the three ways user privileges can be defined. Kunena Forum Privileges (which are also called permissions and/or access) can be set globally for the entire forum, which includes all categories. Or they can be defined for just a single category. In addition, they can be defined by any given user. Thus, there are Global Privileges, Category Privileges and User Privileges.
Kunena Global Privileges
To set Global Privileges, go to Components, Kunena Forum, Configuration, Security Tab:
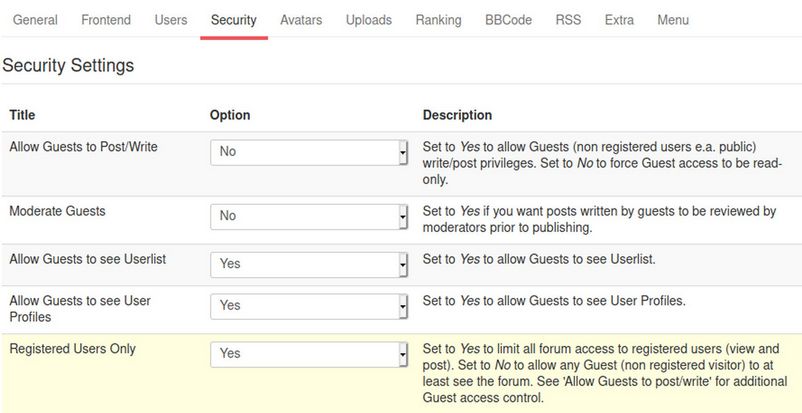
Allow Guests to Post/Write?
Permitting Guests to post/write is generally not wise as it can lead to spamming. Thus most forums set Allow Guests to Post to NO. This means that ONLY REGISTERED USERS will be allowed to write new topics and post questions or comments to existing topics.
Registered Users Only?
If Registered Users Only is set to yes, then Guests will nor even be allowed to view any forum categories. Therefore, if you want Guests to be able to at least read or view your Forum, you must set Registered Users Only to NO.
Kunena Category Privileges
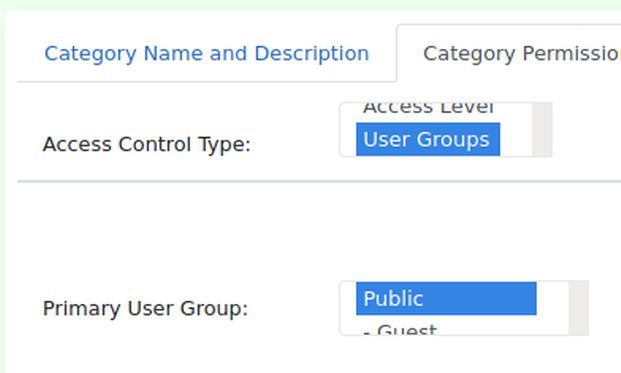
Kunena uses the Joomla user groups such as Registered User, Author, Editor, Publisher, Administrator and Super User to define different levels of access to different Kunena Categories. To set Category Privileges, go to Components, Kunena Forum, Categories and click on a Category. Then click on the CATEGORY PERMISSIONS tab:
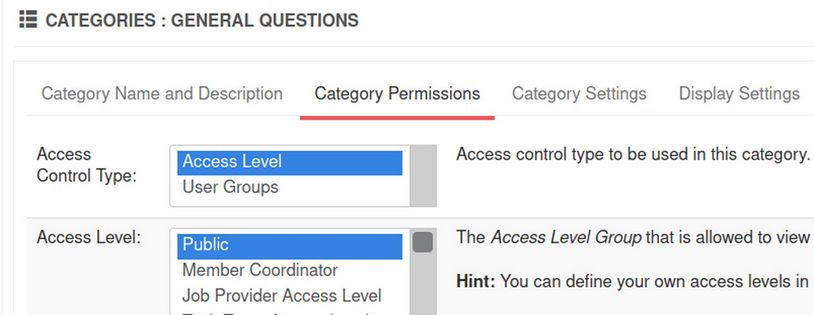
Access Control Type: Should you use Access Level or User Groups?
There are two different ways to set Category Privileges for a given category. The simplest way is with Access Levels (such as is shown above). Access Levels allow for only five group levels – public, guest, super user, registered and special. Click on the User Groups option and you will see more groups to choose from. In fact, the whole screen changes if you click on User Group.
A major benefit of using the User Group option is you have access to the “Manager” option – which we will use below to match up with the Kunena “Moderator” option. In other words, you can assign a person to be a Manager of your website and a Moderator of you forum and they will have access to all of the tools they need to properly perform their moderator role.
Assign a Moderator to a category with the Category Manager
The last tab in the Category Manager is Moderation settings. Kunena forum allows every category to have a different moderator. If there are no moderators assigned to a category, then the super user for the website becomes the moderator for all categories on the forum.
Kunena User Privileges
The third way is to set individual privileges for a selected user. To set User Privileges, go to Components, Kunena, Users. Notice that there is no “New user” button. This is because all Kunena Users first have to register through the Joomla User registration process. They are also assigned to Joomla User groups by the Joomla Super User. They are then automatically added to the Kunena User group.
Kunena User Group Types and Assignment
Kunena User Manager is only used to place Users in specific Forum Roles. Select a User and click EDIT. Then click the Moderation Tab:
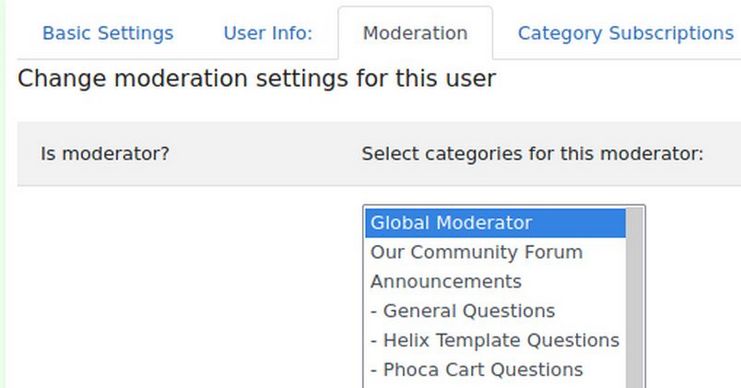
Global versus Category Moderators
Here a moderator can be defined as a Global Moderator for all topics or a specific moderator for a specific category in the forum. Global Moderators, like Super Users, have access to all categories. Category Moderators only have access to a pre-defined category. You must first create a category before you can assign a category moderator to it. A member can be assigned as a moderator to more than one category by holding down the Control Key as you click on the categories you want to assign the member to.
Category Manager LOCKED Setting
Click on the Category Manager, Category Settings tab to see the Locked function. If the LOCKED function is set for NO, then all registered users can post to this specific forum. If it is set to YES, then only Kunena Moderators and Administrators can post topics to this category. Viewers other than moderators can read this category, but can not post to it.
Category Manager Review Posts Setting
Go to Categories and click on a Category to edit it. Then click on Category Settings. If you want a moderator or the super user to review posts and questions before they are posted on the forum, set this to yes. If set for no, then all questions are immediately posted to the forum. If review posts is set to yes, a registered user then submits a new topic (in other words a question) to a specific category. However, the question is not publicly displayed in the category, until it is approved by one of the Category Moderators. After the moderator approves the new topic, the moderator has the option of leaving the topic in the existing category, which is unlocked, in which case any registered user may respond to the question. OR the moderator can move the topic to a locked category in which case only moderators and administrators can post replies to the question.
Recommended Category Settings
To keep it simple, set Global Privileges to No for Guest posting. Set all of your categories to Public for viewing, registered for posting and YES to moderation. This will allow you as the Super User to screen all posts before they are viewed. It will also allow you to keep your forum organized by moving posts to their most appropriate category. Finally, if you need help, assign either Category moderators to help you with a specific category or assign global moderators who can help review and approve all posts.
Privileges Configurations for Special Cases
Below are suggested solutions for two common forum arrangements:
Case #1: Restrict a Category so only moderators can see and post (Moderator Help Forum Category)
A Moderator Help Forum allows you to have a category that is only viewed by moderators and administrators so you can discuss issues relate solely to the management of your forum. To create this category, go the Kunena Category Manager and click on NEW. First, with the Joomla User Manager, assign all moderators a specific Joomla User Type – such as Managers. Second, with Kunena Category Manager, restrict viewer access to the site to that selected User Type. Third, set the category to locked so that only moderators and administrators of that category have access to post on it. Fourth, with Kunena User Manager, make sure all moderators have access to moderate that category.
Case #2: Allow All to See a Category, but only Moderators Post to that category
This is for categories you want the public to be able to view, but to avoid confusion, you only want moderators and administrators to post to this category. The category is set for LOCKED = YES, but viewer access is set for EVERYBODY.
Assign Ranks to Users
Go to Kunena Forum, Rank Manager. Kunena comes with several “ranks” by default. Members start out as New Members but can gain more status as Junior Members after making 20 posts.
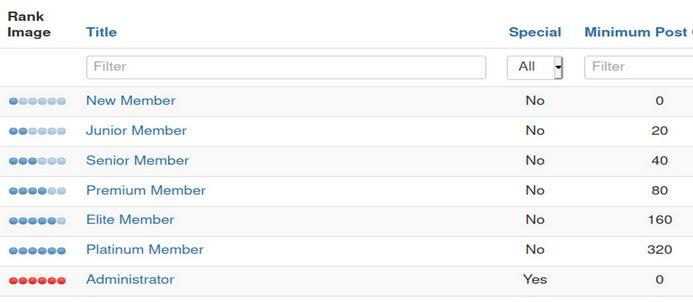
Reduce the number of posts required to help members rise through the ranks more quickly. You can even define different ranks such as Apprentice and Master.
Kunena Terms
Below are what some of the common Kunena Forum terms mean.
Quote - If you wish to quote someone's post whether in whole or in part you simple press the 'Quote' button located beside the 'Reply' button underneath each post. The is very useful if you wish to make light of or expand upon a prior post. Once you press the Quote button you are brought into the same editing environment that you use to edit or create any other post. At this point, you type your response directly to that quote. When you are done, press the 'Submit' button.
Reply Topic - This button functions the same as the 'Reply' button with the exception that your subject line will autofill with the subject of the original post (OP). This may come in handy if you replying to a long post whose subjects may have changed over time but you want to reply to the Original Post. When you are done, press Submit.
Create a New Topic - To start a new topic, navigate to our Index page so you can see the list of our current categories. At the top of the list is a button labeled 'New Topic'. Click that button to start your own topic. Simply type your message and press 'Submit'. Now you have your own topic in the list.
Format your post - Kunena forum uses Bulletin Board Code. BBcode uses 'tags' to 'mark up' your text. Each 'tag' has an opening and closing 'tag' denoted within brackets. An opening tag will look like [ ] and a closing tag looks like [/ ]. Notice the slash in the closing bracket is the only thing that is different. If you forget the slash, the forum will interpret your closing bracket as an opening bracket. The easiest way to 'mark up' your text is usually to type it out first, then select it, and press the appropriate button at the top of the editor. For example, if you wanted to make 'some text' bold you would type it out 'some text', then select 'some text' with your mouse, and then press the 'B' icon in the toolbar located just above the Message area (where you are composing your message). You will now see: [b]some text[/b]. When you preview or submit your message it will be displayed as 'some text'. Alternatively, if you know them, you can type the tags manually right along with the rest of your text or use the buttons at the top of the editor to insert the tags around your text.
6 Simple Examples of Bbcode
[b]bolded text[/b]
[i]italicized text[/i]
[u]underlined text[/u]
[quote]quoted text[/quote]
[size=15]Large Text[/size]
[color=red]Red Text[/color] or [color=#FF0000]Red Text[/color]
[url]http://example.org[/url]
Post a Video to your Forum Message
Embedding a video in your post gives us the ability to show the video in our forum without having to follow a link to some other website to see the video. Let's say you want to post the following Joomla video in your message. http://www.youtube.com/watch?v=JX7167Nn0R4
You could just post the link to the video by using the Bbcode URL brackets above. But this would take viewers away from our website. So to post the videos inside of our website, first put your cursur where you want the video to go. Then click on the Video Icon which is on the far right of the second row in the Text Editor to open this screen:
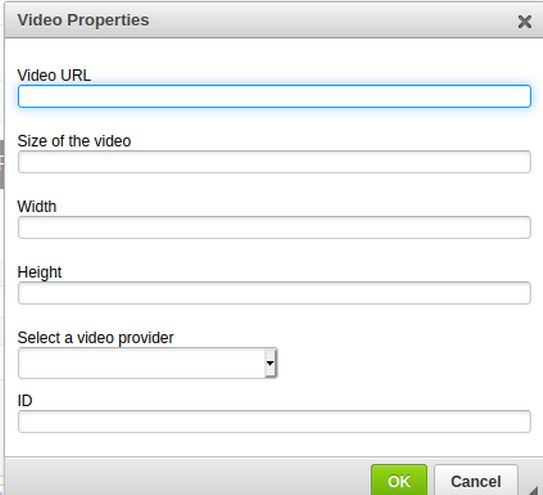
There are two ways to insert a video. You could click on the Provider Drop Down arrow and select You Tube. Then copy and paste the You Tube ID into the ID slot, then click INSERT VIDEO. Or copy, paste the entire URL in the URL box, then click INSERT VIDEO.
Subscribe
At the top and the bottom of every topic you will find the 'Subscribe' button. Pressing this button subscribes you to that topic so that any responses to that topic will generate an email notification to your email address stating that a new post has been made along with a link directly to said post for your convenience. You can also manage your subscriptions in your profile.
Add Images to Kunena Topics
The ability to add images to posts is an important way to clarify questions and comments. Unlike Joomla articles, Kunena Forum posts do not use a Media Manager to organize images in a separate folder from the post. Instead, images are added directly to the post from your home computer. You should still create the posts in the same two step fashion that you create a Joomla article. First, write a document, including images where needed. Then make a copy of the document placing the images as JPGs in an images/post folder and replacing the images in the copy with with text like image01, image02. The result is a text only post with images in a separate folder on your PC. Then create a new post and use the Attachments and Insert buttons to insert your images where needed – as is shown below.
Go to Kunena Forum Home page and log in. Then click on New Topic. To add an image to a Kunena Post, click on the ATTACHMENTS button at the bottom of the message box. Then click Add Files. Then navigate to the image in your File Manager and click on it to select it. This places the image JPG as an attachment to the message but does not insert it into the message.
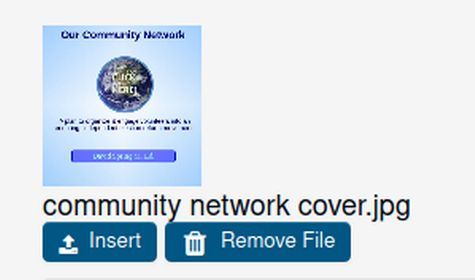
To change the image to an insert in the post, put your cursor where you want the image to go, then click on the INSERT tab that will be visible once an image has been loaded in the ADD FILE field box. Repeat to add more images to this list.
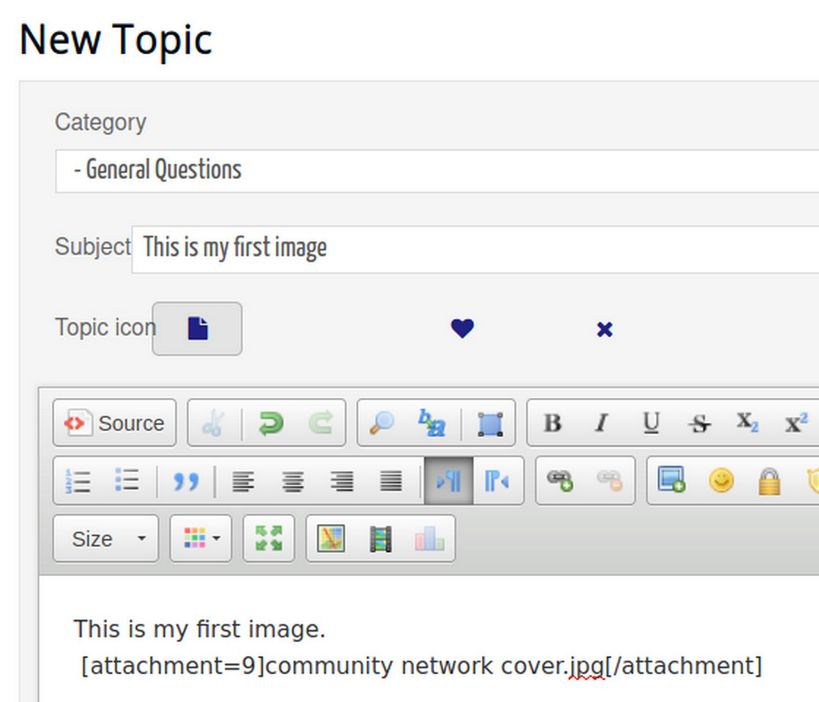
When you click INSERT, code for the image is placed where the image will go. Then click on SUBMIT. Then view your new post to make sure the image was inserted properly.
Upload a PDF to your Forum Post
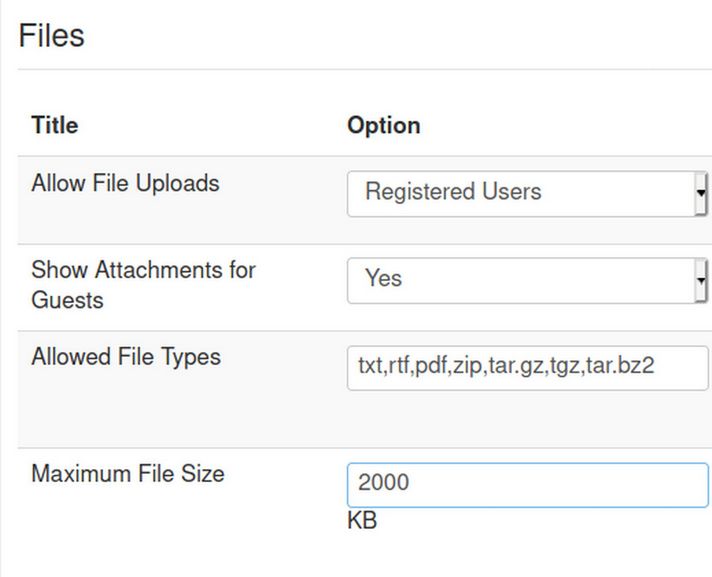
To include a PDF as an attachment to a Forum post, first go to the Kunena Forum Configurations page and click on the UPLOADS tab. Then scroll down to the Files section. Increase the Maximum file size from 120kB to 2000kB.
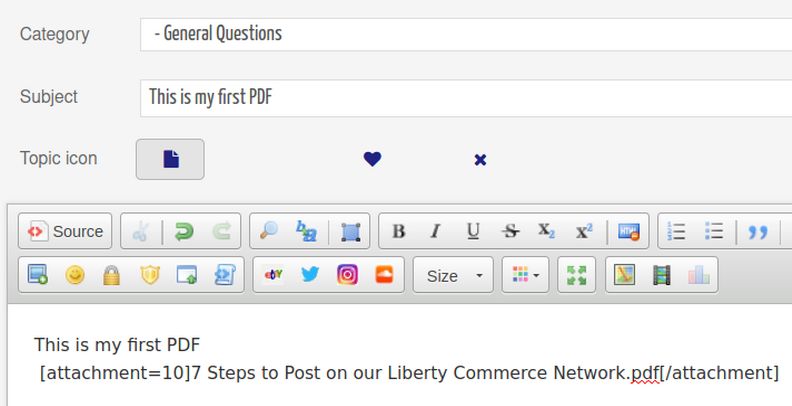
Then click Save and close. Next go to the Forum, log in and click on NEW TOPIC. Then click on the Attachment button and navigate to a PDF in your File Manager. Then click Insert to insert the PDF into your message. Below is what a PDF file looks like after it has been added to the Kunena text editor:
Click Submit. This is what it looks like in your forum post:
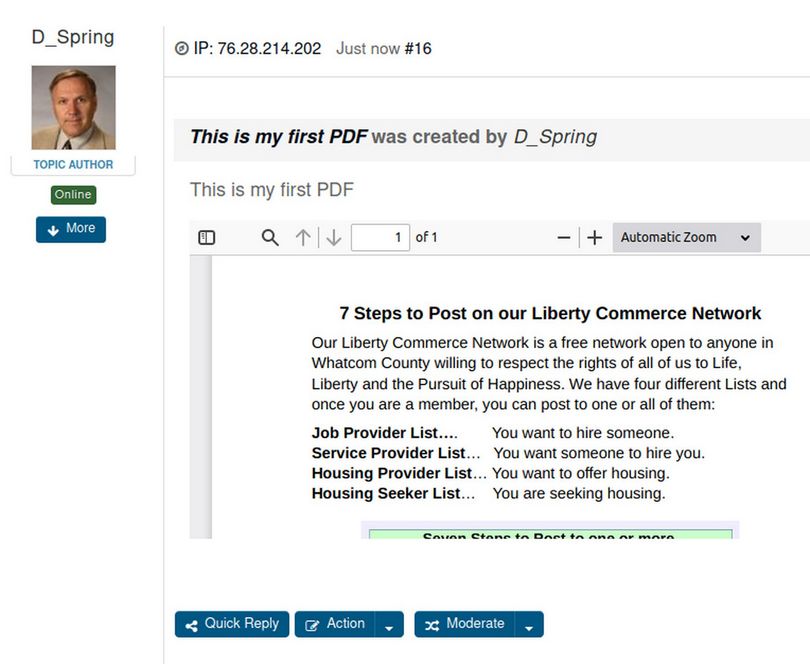
Click on the double arrows in the upper right corner of the PDF. Then click Download to verify that the PDF can be uploaded to your home computer.
Moderate your Forum
Next, we will review how to moderate posts of new members.
Write posts and Replies to the Forum
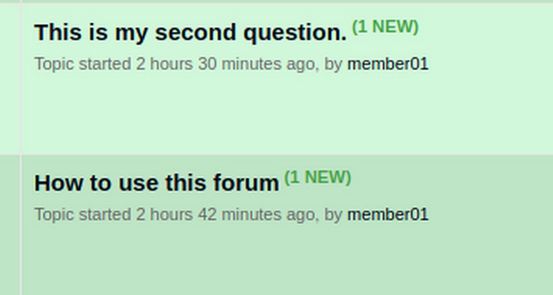
To post a new topic or submit a reply to an existing topic, you first need to register for our website by clicking on Register in the main menu. Once you have registered, click on Login in the main menu. Then click NEW TOPIC in the Kunena menu. Use the Category Drop Down arrow to select the category you want to put your new topic in. We will add a new topic to “How to use this forum.” Then type in your Subject Title, click on an Icon if you want, then type in your message (you can also copy it from a Libre Writer document and paste it into the Message Box. Click on the Control V button for this screen to appear:
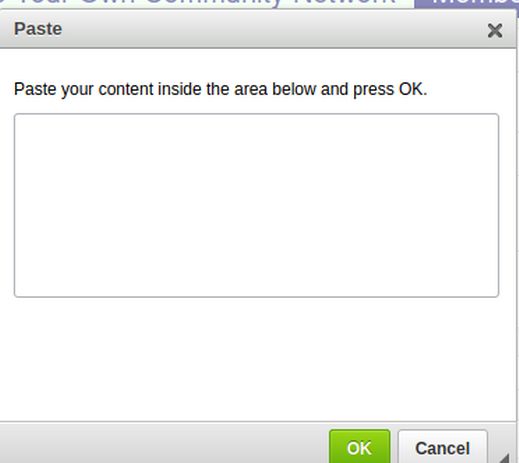
Then press Control plus V on your keyboard to paste any text you had copied into the Paste box. Then click OK. You can add attachments and format any text by selecting it and using the text editor. When you are done, click on Submit. Then click on Index to see that this new topic was posted. If topics are immediately posted, it means that the forum is not being moderated. This is generally not a good idea. Go to Kunena, Configurations, Security tab and increase Moderate New Users from 0 to 2. This will require that a new users first two posts are moderated. Then go back and create a second post as a new member. Then click Submit. This message will appear:

To approve this post, log out as the member and log in as a Forum Administrator. In the Category, you will see a Pending Message:

Click on the Topic to open it. In the lower right corner are a bunch of Buttons. Click on the MODERATE button. There will be three options, Moderate, Delete or Approve. Click on the Moderate button. Then click on the Move tab to move a topic to a different category.
Approve the topic and it will be posted and the member will receive an email letting them know that their topic has been approved and posted.
Preview, Approve and Assign New Member Posts
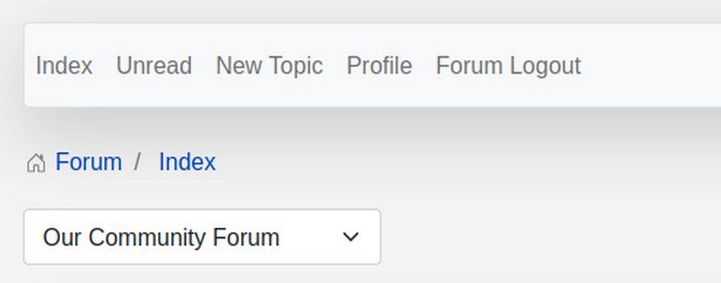
One of the primary ongoing jobs of a moderator is to review and approve posts submitted by registered users. There is an option in Kunena Configurations to receive an email every time a person posts a new message to a category that you are moderating. If you do not want to receive these emails as questions are posted to your forum, you can also click on them to review them. To activate the New Posts tab in the Kunena Menu, go to Menus, Kunena Menu and click on the Unread menu item to edit it. Change its title to New Posts and publish it. Then click Save and Close. Then log into the front end of your website as a moderator or super user. Then click on New Posts to review them. New Posts are indicated in the main forum sections and categories view.
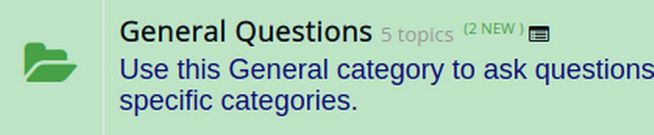
Click on this category to see the new posts.
Click on the post to open it. This Message View screen can be pretty confusing. There are Action and Moderation buttons in several places:
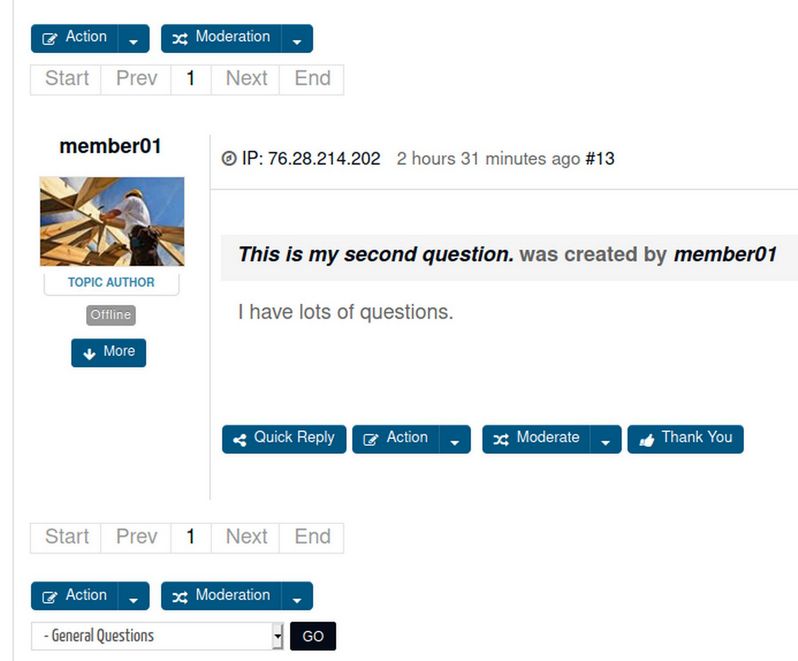
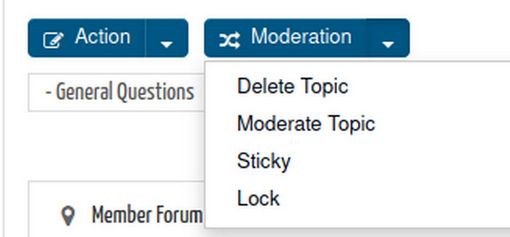
The Action and Moderation buttons above and below the message box refer to the entire topic. Click on either of these Action buttons to see three options: Reply Topic, Subscribe or Favorite. Moderation options are: Delete Topic, Moderate Topic, Stick Topic and Lock.
The Quick Reply, Action, Moderation and Thank You buttons inside of the Message Box refer to that specific message. To approve the message just click Approve. This one message at a time method is a rather slow way to approve pending messages – especially if you have a big forum with a lot of categories. Thankfully, there is a better and simpler way to locate ALL PENDING POSTS to make sure they all get reviewed.
Log in as a Moderator or a Super User. Then click on your PROFILE tab. Any pending posts which are awaiting your approval will be listed here under a tab called UNAPPROVED POSTS:
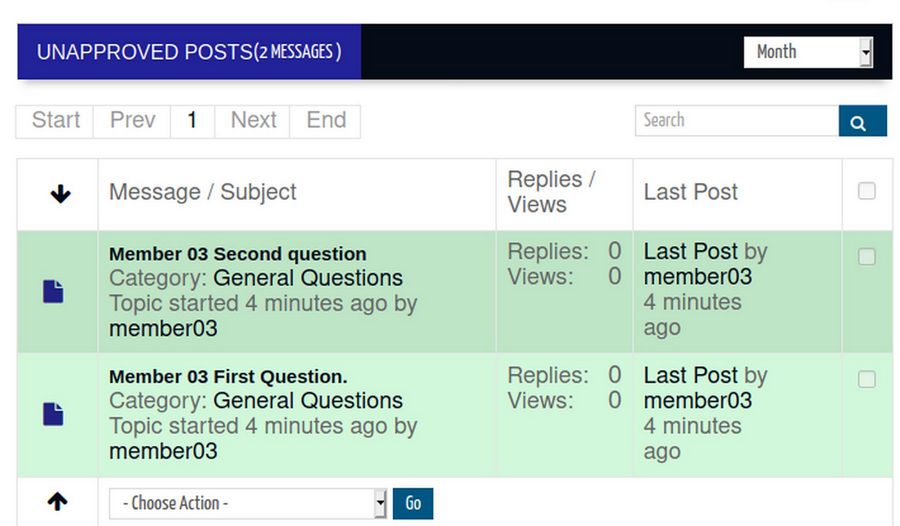
Check the tiny boxes on the right side of the screen to select the posts. Below the pending message is a drop down arrow box. Click on this to bring up the Approval Options. Click on Approve Selected to approve the post. Then click GO. Alternately, if you want to read the entire post before approving it, click on the Topic to go to the Moderator Review page and then if it is okay, click on APPROVE in the lower right corner.
Moderate Message
If you have set a category to require moderation, when users post to this category, they will be notified that their message is “pending approval.” When you click on a pending message to moderate it, there will be an APPROVE button below the message. You can also reply to, edit or delete a message.
For more detailed options, click on the MODERATE button inside of the message box to be taken to the Moderate Message screen.
There, you can assign a topic icon to this message. A green check mark usually means the question or problem has been answered.
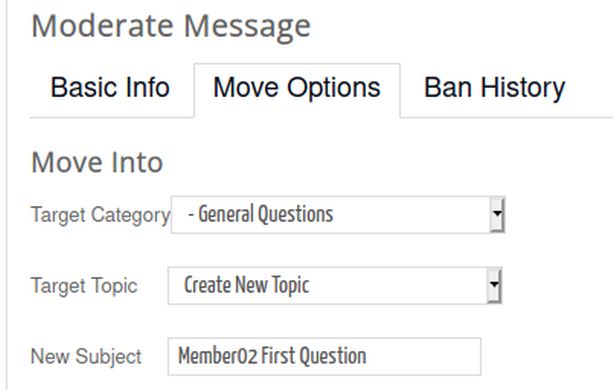
Click on the Move Options tab to bring up several options:
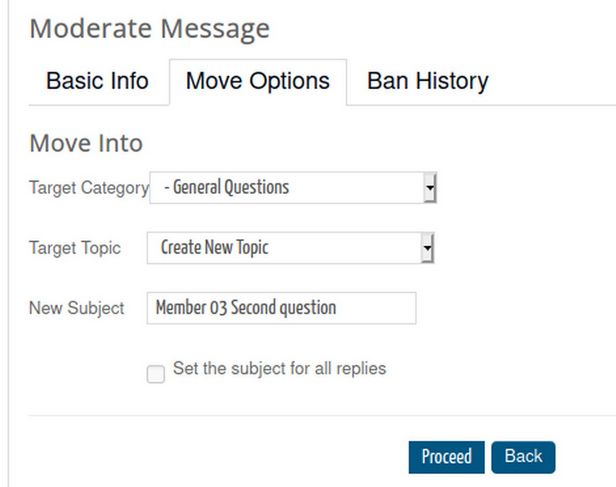
Here is what each of the above three options means:
TARGET CATEGORY: You can move the message to a new category. Use the drop down arrow in Target Category to move the message to a different Category. Then click Proceed. The Topic Move feature is especially useful to move a topic from an unlocked category to a locked category.
TARGET TOPIC: You can move the message to another topic in the same category. This is called Merging because the message is now merged with messages in another topic.
NEW SUBJECT: You can change the message subject (or rename the topic) if you think the message needs a clearer or more descriptive title.
Click the Back button to go back to the previous screen.
How to Moderate the entire topic
Instead of clicking on the Moderate button inside the message box, you can click on the Moderation Button outside of the Message box. This will allow you to moderate the entire topic (which is a group of messages, questions and replies). Using the Moderate Topic button is similar to what was described above except that the actions are performed on the whole topic, not just a single message. In effect, you can move threads from one category to another and, optionally, change the topic subject.
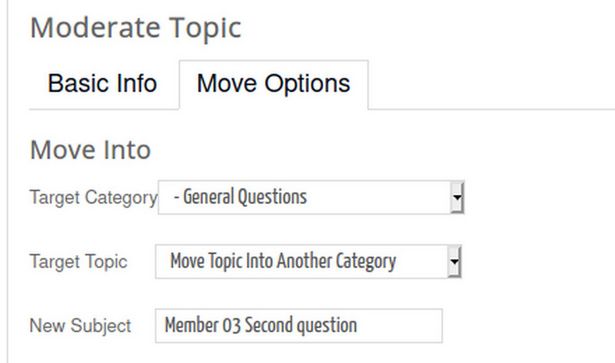
This screen looks similar to the Moderate Message screen. But there are some important differences.
TARGET CATEGORY: You can move the entire topic to a different category. To move it to this category, use the drop down arrow in the Target Category and select a new target category.
TARGET TOPIC: You can merge the topic with another topic.
NEW SUBJECT: This changes the name of the entire topic.
Sticky and lock a topic
You can also click on the sticky post option which will put it at the top of your forum or the lock option which will prevent anyone other than a moderator from posting to this topic. To use the sticky and lock functions, just click on the “sticky” or “lock” button. The lock and sticky buttons are located at the top and bottom of a topic in a topic itself. The sticky function keeps it from sliding down the category as new topics are added. In other words, it stays at the top of the category. Even if the topic had been pushed down by a new post, selecting a topic and clicking on STICKY, moves it to the top of the category and gives it a different color from the rest of the posts.
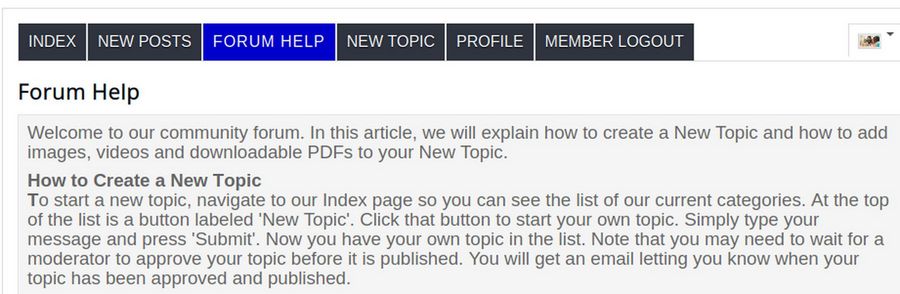
Create a Forum Help Page
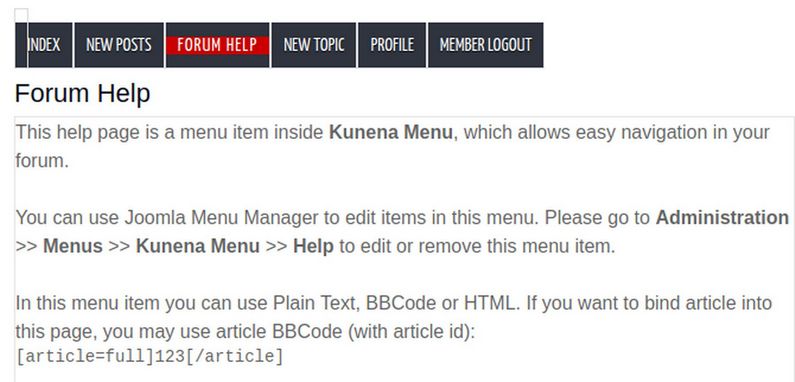
There is a Kunena Menu Item called Help. Click on it to edit it. The Menu Item type is called Custom Content. Change the name to Forum Help. Then publish the Menu Item. Then click Save and Close. Then log into the website front end and click on Forum Help.
What we will do instead is create a Joomla article called Forum Help. This article will explain how to create a New Topic and how to add images, videos and downloadable PDFs to your New Topic. Once your Joomla Forum Help article is done, click Save. Then click CODE VIEW. Then copy paste the HTML version of your Forum Help article into your clipboard. Then go back to the Kunena Menu and click on the Forum Help menu item to edit it. Click on the Main Settings tab. Then change the Format to HTML and paste the HTML version of your Forum Help article into the Contents box
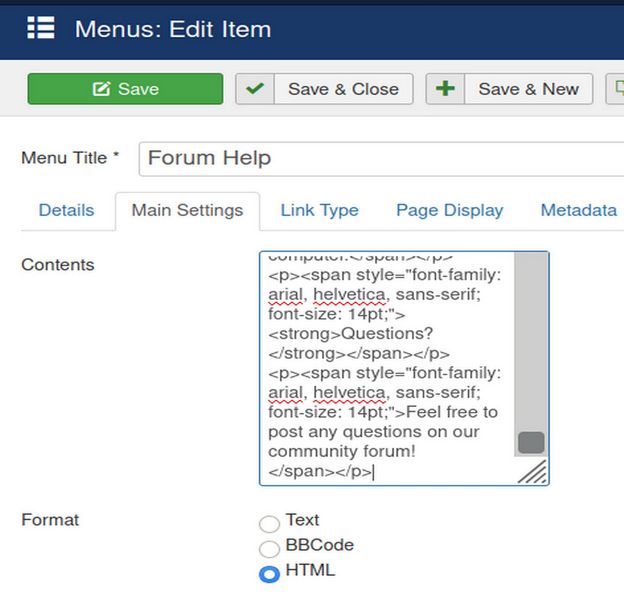
Then click Save and Close. Then log into the forum and click on the Forum Help Menu Item:
Now that you know how to create your own posts and moderate the posts of others, you are ready to explore the rest of the forum. If you don't understand how to use something, make a post in the forum and ask for help. After all, that is what our forum is all about!
What’s Next?
This concludes our introduction to Kunena Forum.