
In our last article, we used Hestia to install Joomla. In this article, we will take a tour of the Joomla 4 Admin Dashboard and then make some changes to the Dashboard to make it easier to use.
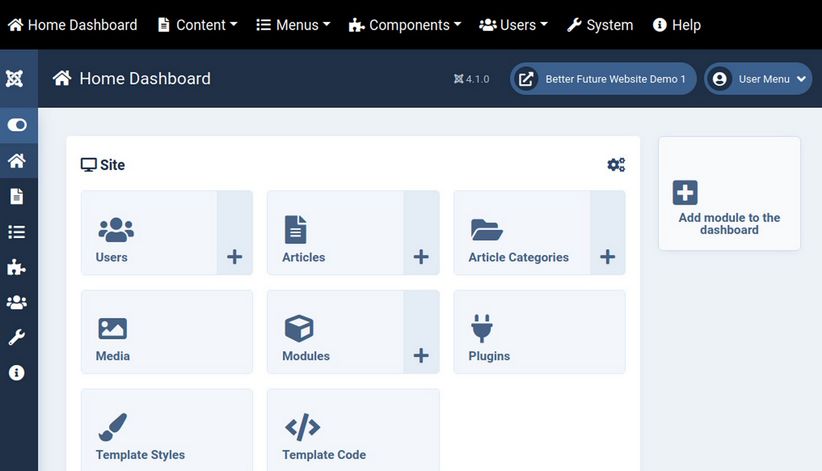
Here is an image of the Joomla 4 Admin Dashboard:
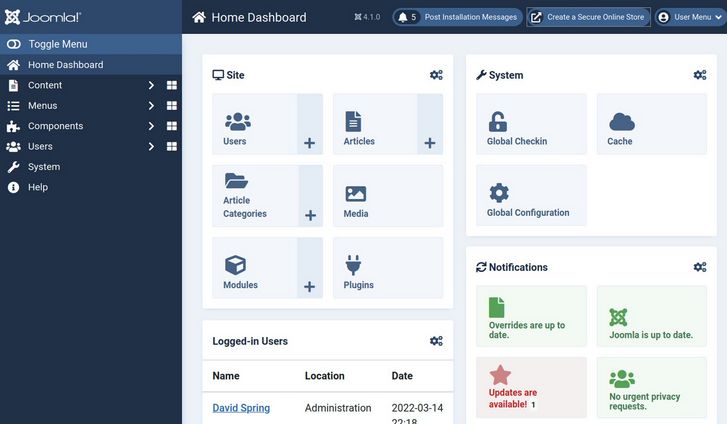
There are 9 modules displayed in the main area plus a Main Menu in the sidebar (with 30 hidden links) and 5 more links in the top bar. The System menu item has 31 more links. Many you will never use.
High Priority Tasks
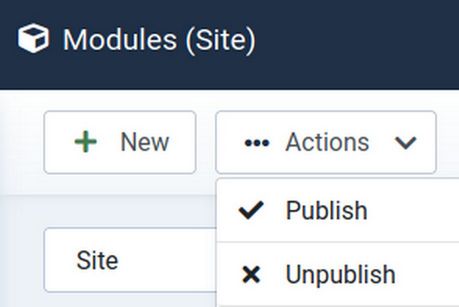
Before we take a tour of the Dashboard, we need to complete four high priority tasks. First, click on Modules. Then select the Login page. Then click Actions, Unpublish. Then go back to the Dashboard.
Second click on Global Configurations.
In the Site tab, scroll down to Meta Settings and add our Meta Description. This will help search engines properly categorize your website. Your site meta description should be no more than 160 characters – or about 20 words long.
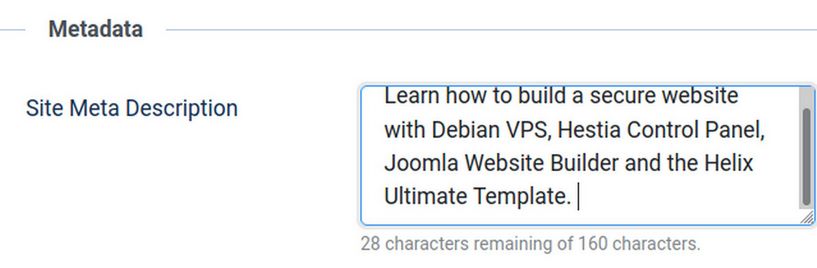
Learn how to build a secure website with Debian VPS, Hestia Control Panel, Joomla Website Builder and the Helix Ultimate Template.
Note that there is a drawback in using a Global meta description in that it means that any page on your website which does not have its own unique meta description will be assigned the global description. This in turn means that many of the pages on your website will have a “duplicate” description which is something that search engines do not like. Therefore if you assign a global meta description, you should also add a free Joomla extension to automatically generate unique meta descriptions for each page on your website. We review how to do this later in our article in Search Engine Optimization Tools.
Next, scroll down further on the Global Configurations, Site Tab screen and change Use URL Rewriting from no to yes.
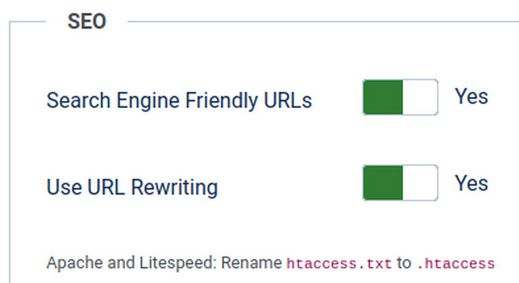
If Use URL Rewriting is set to NO, the URL to this content article page will include “index.php” which is bad because this can confuse your readers. http://mysite.com/index.php/getting-started
When this parameter is set for YES, Joomla will use the rewrite function of Apache web servers to eliminate the index.php part of each URL. This will change the example URL above to a shorter and more understandable link such as http://my>website.com/getting-started
Note that for this to work, the file htaccess.txt must have been renamed to .htacess. There is a dot placed in front of the word htaccess. We did this before installing Joomla right after we renamed the index.html file.
Fourth, click on the System tab and change Session Lifetime from 15 minutes to 99 minutes. This will reduce the chances of being logged out of your website while you are working on it.
Delete Most of the Admin Modules
The Dashboard looks a lot less confusing if you delete some of the admin modules. We will therefore delete all of the Admin modules except the Site module. Click on the setting wheel icon in the upper right corner of the System module and click Unpublish:
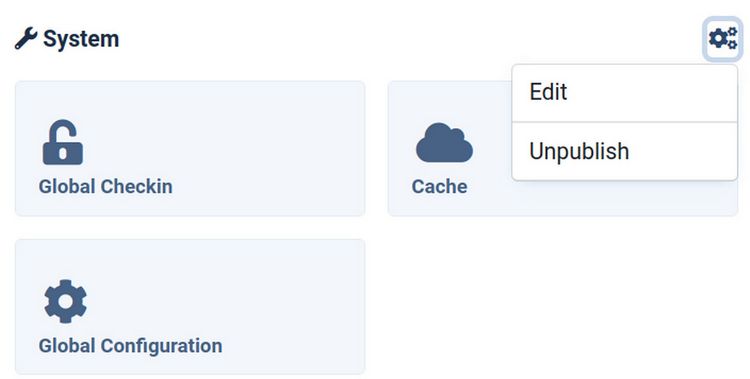
Repeat to unpublish the Notifications, Sample Data, Latest Actions, Privacy Dashboard, Logged in Users, Popular Articles and Recently Added Articles. Here is the result:

Then click on the Settings wheel for the Site module and click Edit. Change Media, Template Styles and Template Code from Hide to Show. Here is the result:

Side Menu Sub Menus
The Side Menu includes Content, Menus, Components, Users, System and Help. Click on Content in the left side menu to see this sub menu:
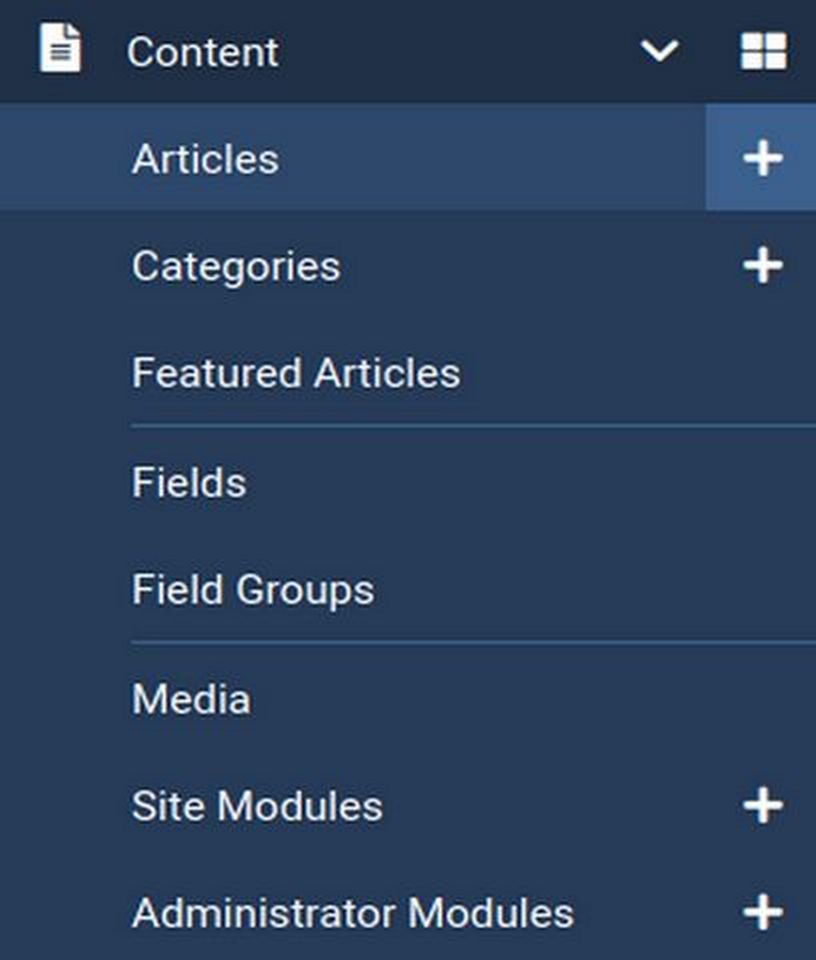
Articles is a Table displaying all of the articles each of which can be a separate web page.
Categories is a Table of categories that articles can be assigned to.
Featured Articles are articles that are assigned to appear on the Home page.
Fields are boxes of content that can be inserted into articles.
Field Groups are categories that fields can be assigned to.
Media is the Images Manager that holds all of your images. It includes a folder maker that allows you to put images into folders and even put folders in folders to keep your images organized.
Site modules are modules that appear on the front end of your site.
Admin modules are modules that appear on your Dashboard.
Click on the four boxes to the right of Content to bring up a Content page:
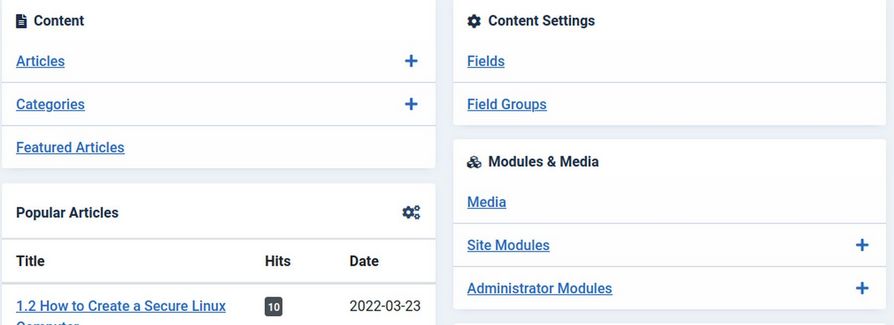
Even if we unpublish Popular Articles from the Dashboard, they still appear on the Content screen.
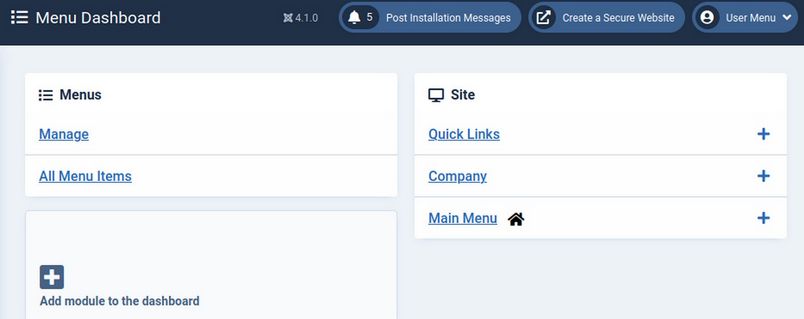
Click on Menus in the side menu to see this sub menu:
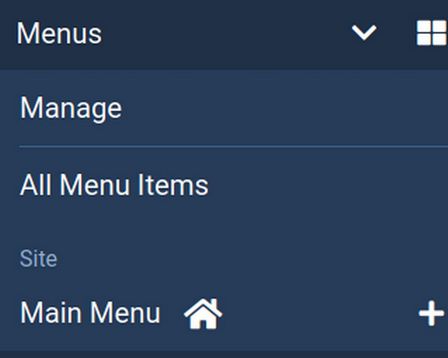
Manage is a Table of all of the Site Menus. Initially, there is only one Site Menu called Main Menu. But you can go to this screen to create another menu if you want.
All Menu Items is a table of all of the menu items, regardless of what menu they are assigned to.
Main Menu is the main menu for our website. Currently, it only have one menu item called Home.
Here is the Menu Dashboard:
Click on Components in the Side Menu:
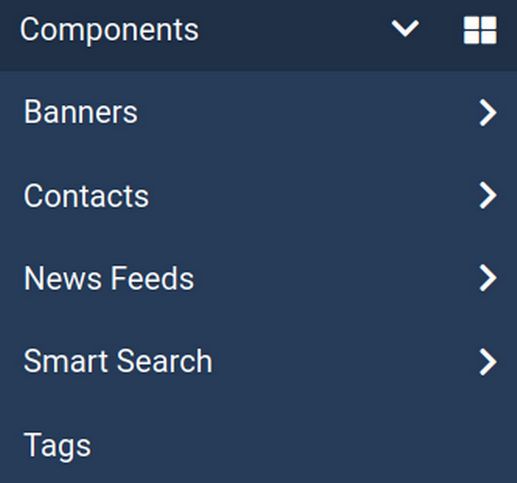
Initially, there are only five components.
Banners are a set of images used in the Joomla demo content. We will use different tools instead of banners.
Contacts are a set of users who can be sent messages. We will use different tools instead of contacts.
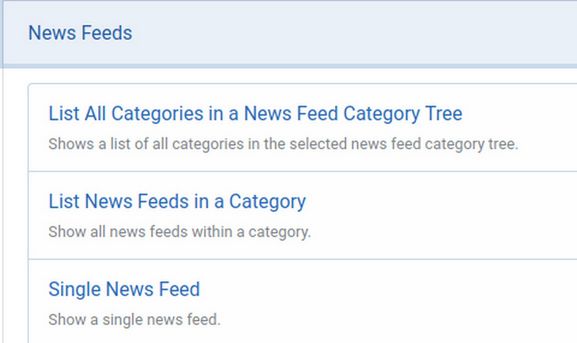
News Feeds allow you to add News Feeds from other websites to your website. You can add links to these feeds by first creating a News feed (add the link to the other page). Then create a News Feed page with Menu Item, New and click on Menu Item Type. Then click Single News Feed.
Smart Search is a search box you can place on your website and is mainly useful if you have a very large website with a lot of content.
Tags is similar to Wordpress tags. I do not recommend tags and they are not search engine friendly and tend to turn your website into a mess. You are much better off creating Categories and Sub Categories and placing your content in a category or sub category.
Click on Users to see this sub menu:
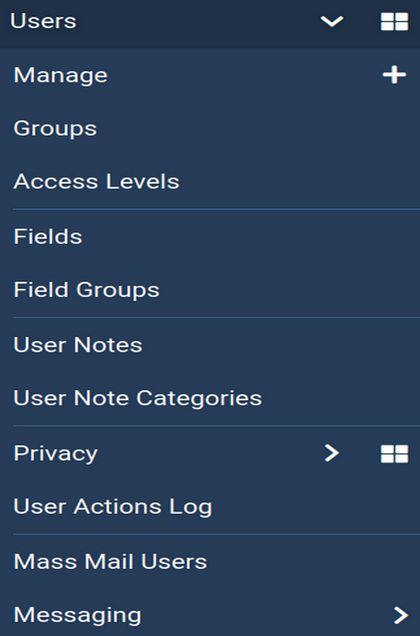
Manage is a Table of all of your users.
Groups is a table of 9 default groups. You can create as many groups as you want. Groups define who can take actions.
Access levels is a table of 5 default Access Levels which define what different groups are allowed to see. You can create as many access levels as you want and assign them to any groups.
Click on System to go to the System Dashboard:
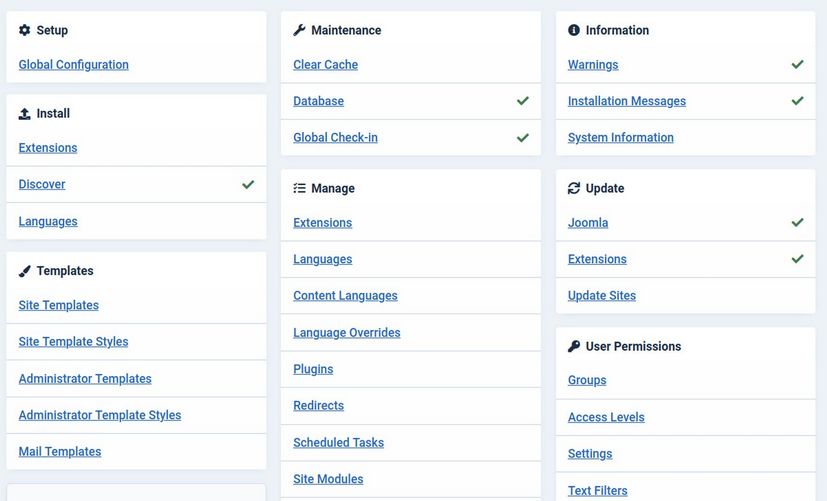
This currently is the only way to get to the Install Extensions page. A lot of the rest are duplicate links that would be easier to reach by using a different menu item. Also, since we have hidden the System module, it is currently the only way to get to Global Check-in. We will soon as a top menu to give us another easier option.
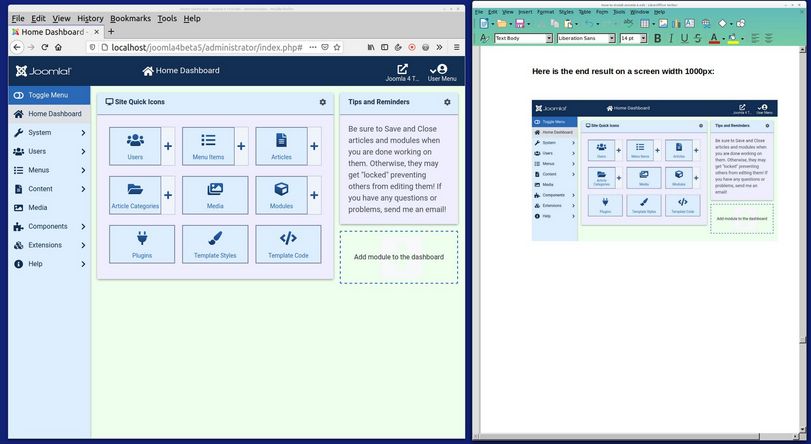
Add a Top Menu for easier Side by Side Editing
One of the most important web building skills I teach my students is using Side by Side Editing. This process involves using a text and image editor like Libre Writer to create the content for your website. Then having a web browser open to your Joomla Dashboard next to the Libre Writer workspace to copy and paste content from your Writer document to your Joomla website dashboard. Here is what side by side editing looks like on a 15 inch laptop screen.
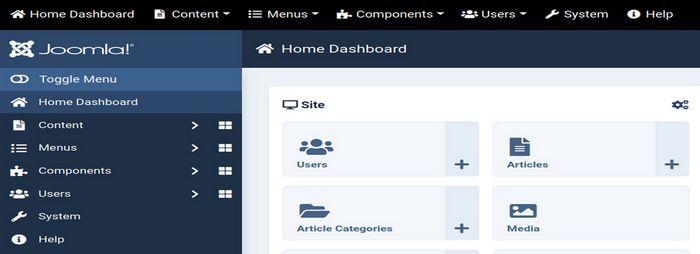
The Joomla 4 Dashboard is radically different from the Joomla 3 Dashboard in that the main menu was moved from the top of the screen to the left side. The problem with this move is that it makes it much harder to do side by side ending. Thankfully, there is an easy way to fix this problem. There is a free extension on the Joomla Extensions Directory that adds a top menu. Here is the download link: https://www.phoca.cz/download/category/123-phoca-top-menu-module
Click Systems, Extensions, Install to install this extension. Then go to the Module Manager and change the display from Site to Administrator. Then click on the Phoca Top Menu Module to edit it. Change the position to Custom Top and publish the module. Click Save and Close and return to the Dashboard. Here is the result:
To hide the side menu, click on Toggle Menu at the top of the side menu.
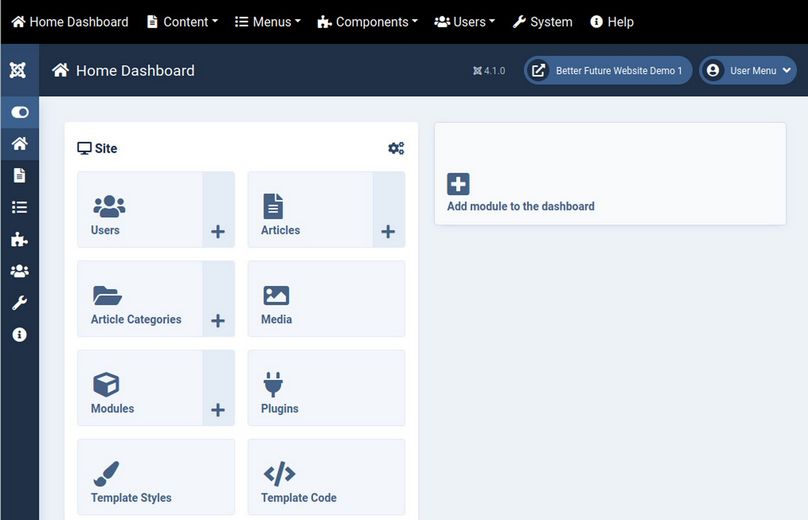
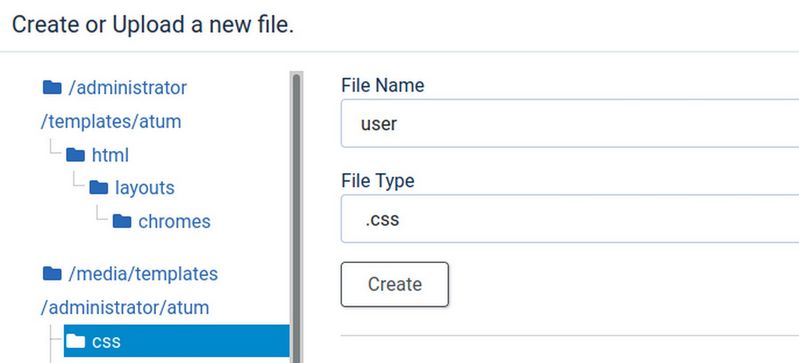
The Add Module box is still taking up way too much room. We need to add one line of CSS to the Admin template, called Atum to fix this problem. Go to Templates, Code and change the screen from Site to Administrator. Then click on Atum Details and Files. Then click New File. In the File Name box, type user. For File Type, select .css. Then click on the css file in the left column to select it.
Then click Create. Then copy paste the following into Line 1
.card-columns {grid-template-columns: 4fr 1fr;}
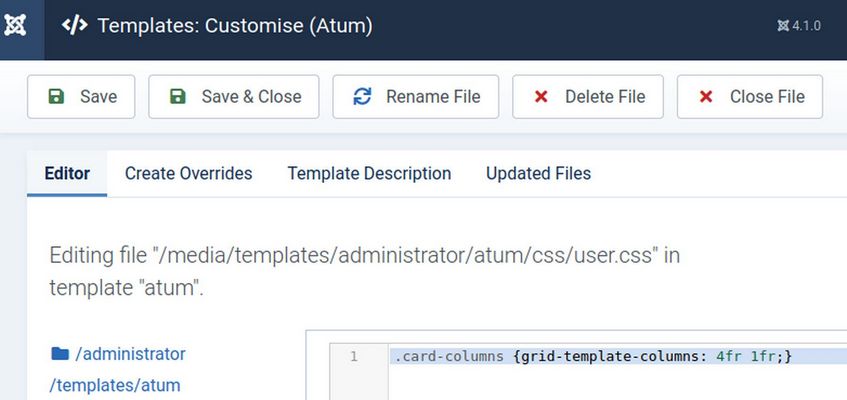
Then click Save and Close. Then click Close. Then click Home Dashboard. Then clear the browser cache. Then log back in.
We now have a Joomla 4 Dashboard that can be narrow enough to work with side by side editing.
What’s Next?
In our next article, we will explain how to research and add extensions. We will then add six important security extensions.