
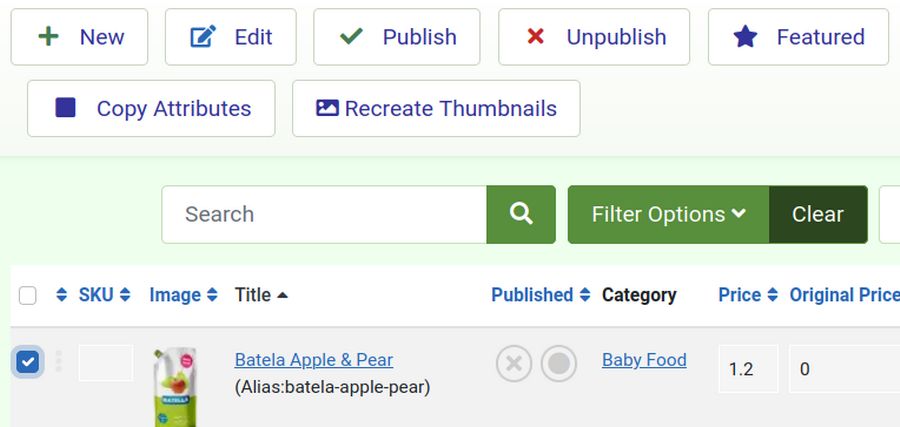
As we noted in the last section, product attributes are useful to help customers choose a size or a color of a product. But they are also used to automatically adjust your product inventory. It can take some time to create a combination of size and color options for a given product. Thankfully, once an Attribute combination is created, you can simply copy this combination of attributes to another product. Go to Components - Phoca Cart - Products. Select products to which you want to copy the attributes and click on Copy Attributes button.
Why Attributes should generally be required
When we set up attributes for a product, we typically want to require the choice of an attribute, even if there is no extra charge for the attribute, not only because we want to ship our customer the size and color they want, but also because we are using this function to automatically adjust our inventory. This may involve setting one of the attribute options as the default value. Two problems occur if you do not use required attributes. First, if there is a price difference, it may not be included properly at Checkout. Second, the inventory change may not be properly recorded.
Create a Practice Product
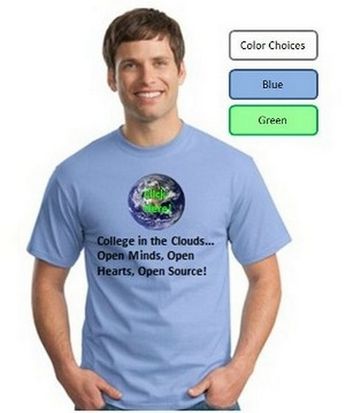
We will use the example of a T Shirt to create a practice product to see how attributes work in Phoca Cart.
First, we will create a product image for our T Shirt.
Right click on the image and compress it to 150 DPI. Then save this image to the images, products folder in the clothing folder on your home file manager.

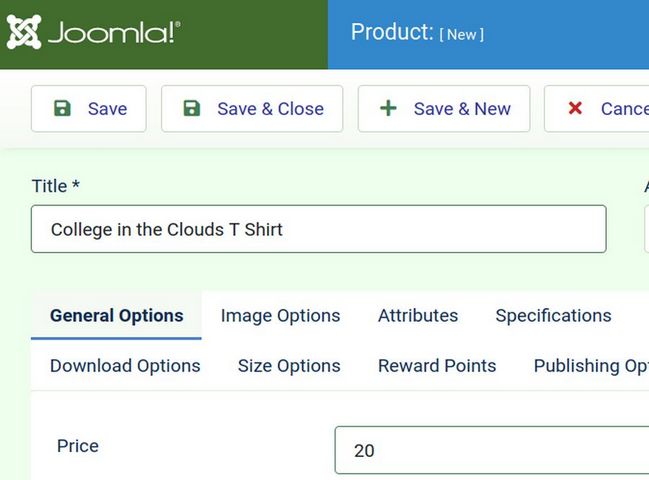
Then go to Phoca Cart, Products and click New. For Title, type College in the Clouds T Shirt. Give it a price of 20.
For Category, click on the box and select Clothing. Then scroll down and copy paste this short description.
Our T Shirts are 100 percent cotton, include our College in the Clouds logo.
Then copy paste this into the Long Description and Features boxes:
Our T Shirts are 100 percent cotton, include our College in the Clouds logo. They come in two colors, light blue and light green, and three sizes Medium, Large and Extra Large.
Then click Save. Then click the Image Options tab and click Select Image. This will bring up a list of our current product image categories. Because this is the first product in our Clothing category, we first need to create the Clothing folder. Click Create Folder.
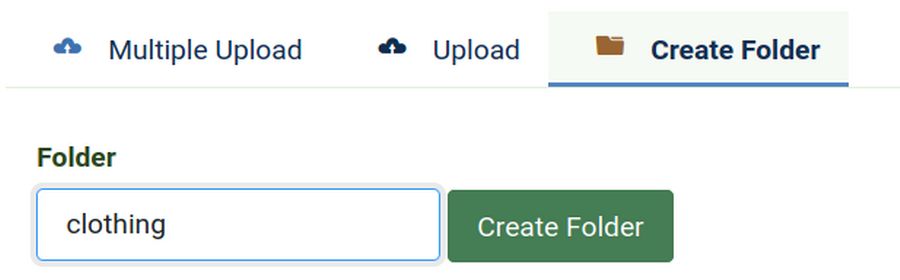
Type clothing. Then click Create Folder. Then click on the clothing category to open it. Click the Upload tab. Then click Browse and navigate to the tshirt image. Then click Start Upload. The reply will be File Uploaded. Then select this image to assign it as the Tshirt Product image. A Yellow Popup will indicate that the Thumbnails have been created. Click Save.
Add Tshirt Color and Size Attributes
Click the Attributes Tab. We will first create an Attribute called Pick a color. We will then add Pick a size. Click the plus sign to add our first attribute. For Title, type Pick a color. For Required, click Yes. For Type, select Color (Select).
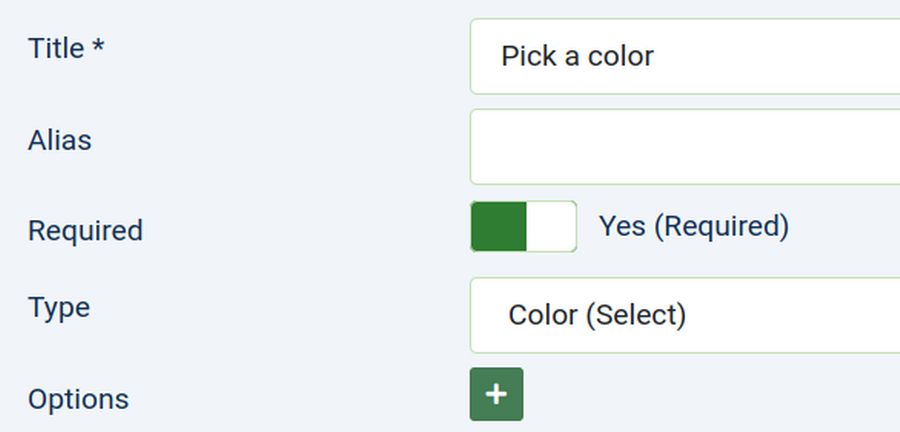
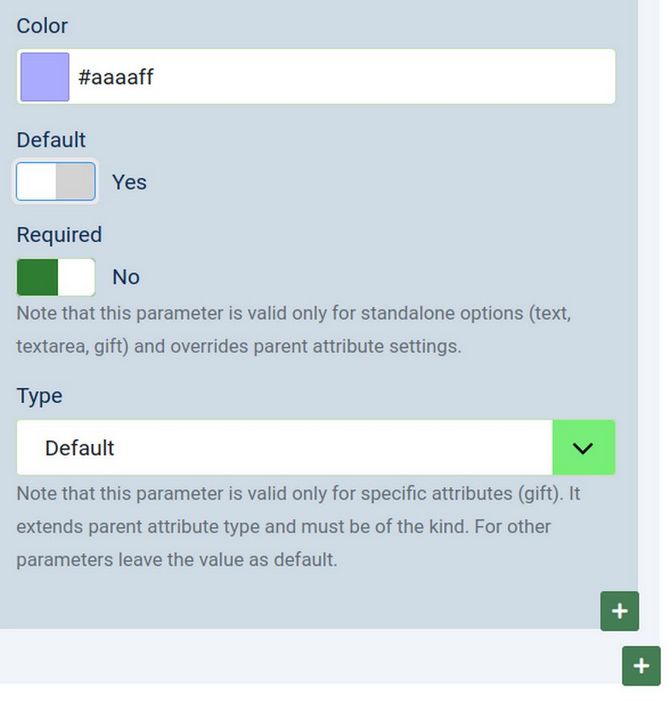
Then click the Options plus sign to add an option. For Title, type Blue. For Amount, enter 0, for Stock enter 0 and for Weight enter 0. Stock 0 (means that the stock value has not yet been set). Amount (to add this color option) 0 means there is no extra cost for this color. Weight (to add to the color option) 0 means there is no extra weight for this color. For Color, enter #AAAAFF. For Default, enter Yes. For Required, leave it at No.
Then click on the Options Plus Sign to add a second option.
For Title, type Green, For Amount, enter 0, for Stock enter 0 and for Weight enter 0. For Color, enter #AAFFAA. For Default, enter No. For Required, leave it at No.
Then click on the bottom plus sign to add a Second Attribute. For Title, type Pick a size. For Required, click Yes. For Type, click Select.
Then click on the Options plus sign to add an Option. For Title, type Medium. For Amount, enter 0, for Stock enter 0 and for Weight enter 0. For Default, enter No and Required enter No.
Then click on the Options plus sign to add a second option. For Title, type Green. For Amount, enter 0, for Stock enter 0 and for Weight enter 0. For Default, enter Yes and Required enter No.
Then click on the Options plus sign to add an Option. For Title, type X-large. For Amount, enter 0, for Stock enter 0 and for Weight enter 0. For Default, enter No and Required enter No.
Then click Save and Close.
View the Product Attributes in the Front End
Visit the Shop and click on the Clothing category. Then click View Product.
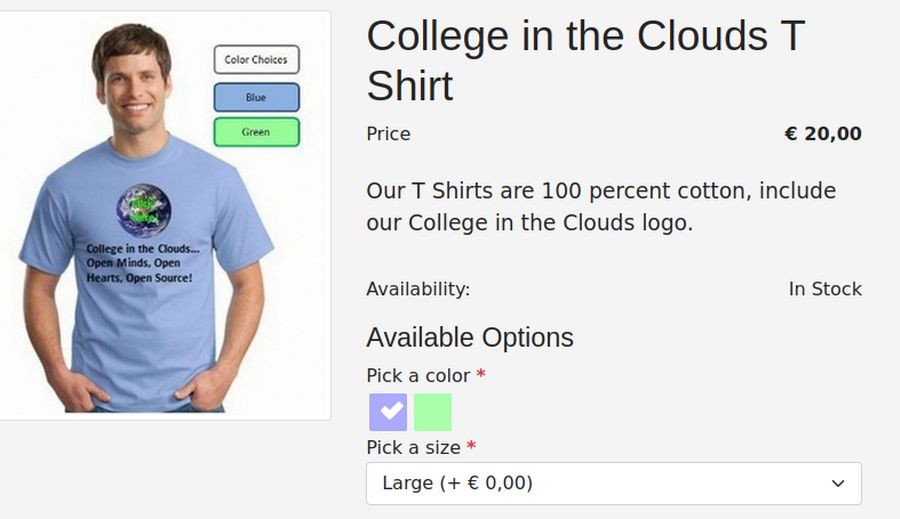
Note that both color and size have an asterisk – meaning that each is required. Also note that Blue and Large are default – meaning if they do not change the color or size, they will get a large blue Tshirt.
Click Add to Cart to add the default option. Then change the color to Green and the size to medium and click Add to Cart. Then click View cart:

Congratulations! You now know how to add sizes and colors to your products. You also have attributes set that can be copied to other products in the future.
What’s Next?
Now that we understand how to correctly add sizes and colors to our products, in the next two sections, we will review how to add and structure several different kinds of shop menus and menu items.