
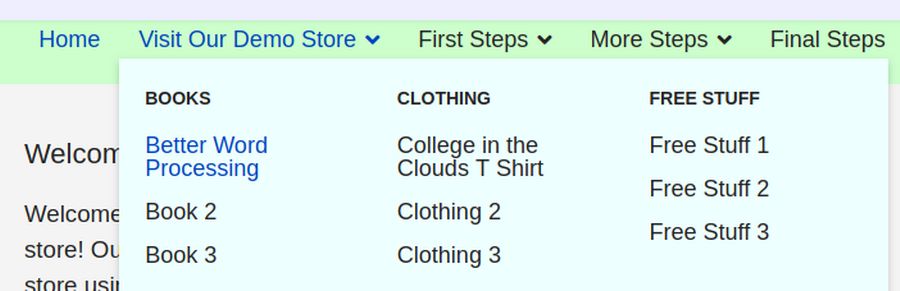
In article 2.4, we adding the Helix template to our website and did some basic changes such as adding a new row and module position to display our Main Menu. In this article, we will review how to use our Helix template to add a custom Mega Menu. Here is what our Shop Mega Menu will look like when we are done:
Review of Setting Up the Helix Horizontal Menu
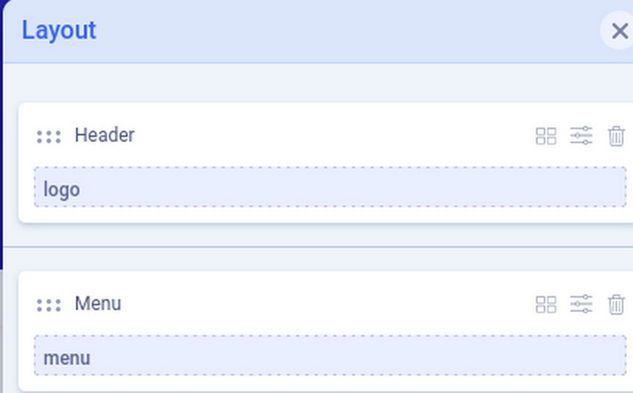
To see our Helix menu, we did three things. First, we used the Helix Layout tool to create a row called Menu with a menu module position. The word menu is very special because the Helix menu will automatically use this menu module position.
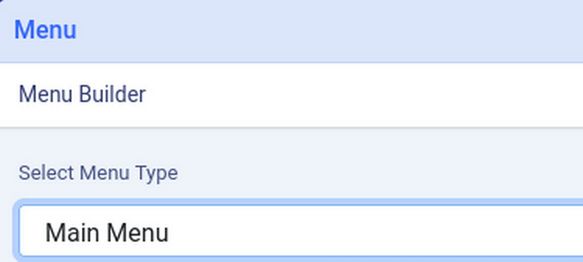
Second, we clicked on Menu and set the Helix Menu Builder for Main Menu:
Third, we create some menu items by going to Menus, Main Menu. Initially, there was only one menu item called Home. We since created a new menu item called Visit our Online Store. We will now create some additional “placeholder” menu items to see how to use the Helix template to create a mega menu for our Online store. .
Step 1 Add Three Second Level Menu Items
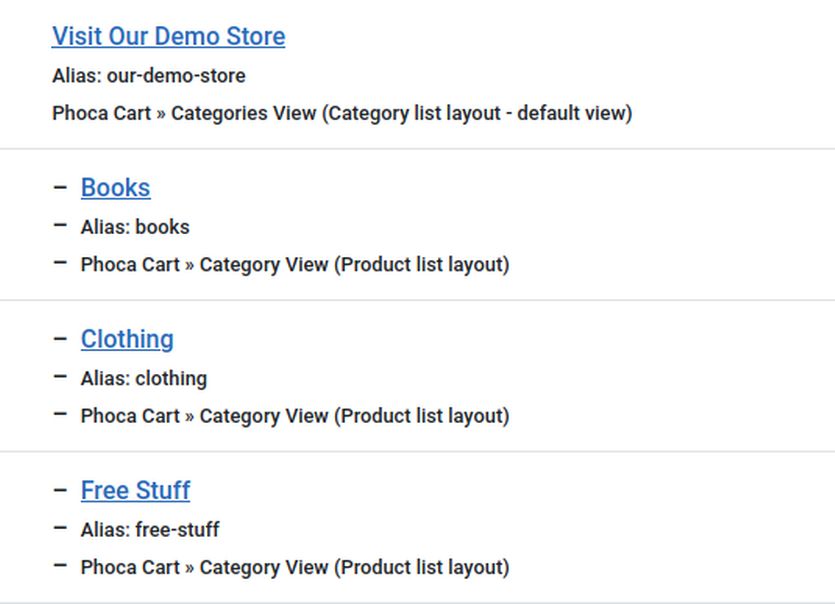
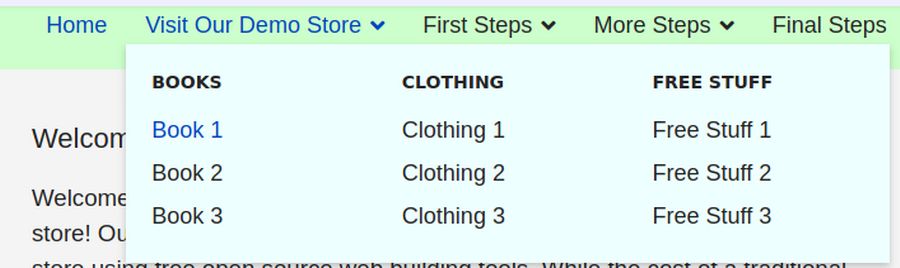
We will create three second level menu items called Books, Clothing and Free Stuff. Click New.

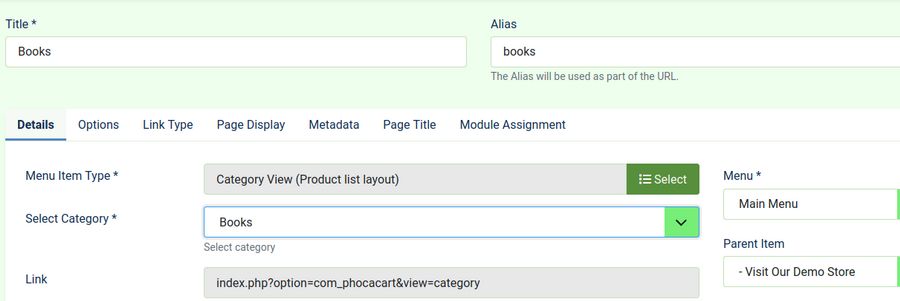
Then click the Select button. Click Phoca Cart Category View. For Title, type Books. For parent, select Visit our Online Shop. For Category, select Books.
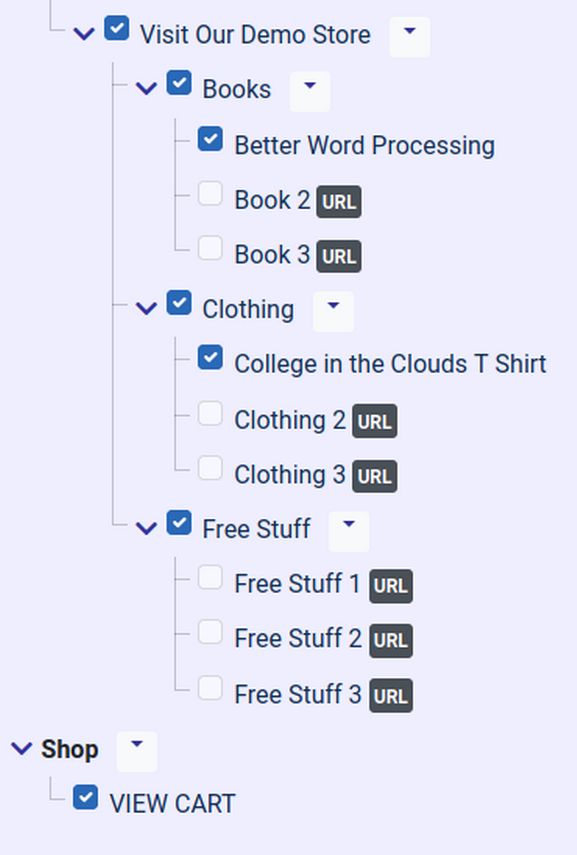
Then click Save and New. Repeat to create Clothing and Free Stuff. Then click Save and Close. Here is the Demo Store section of our Main Menu in the back end:
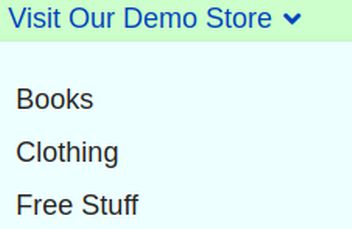
Here is the Demo Store section of our main menu in the front end:
Step 3 Add 9 Third Level Menu Items
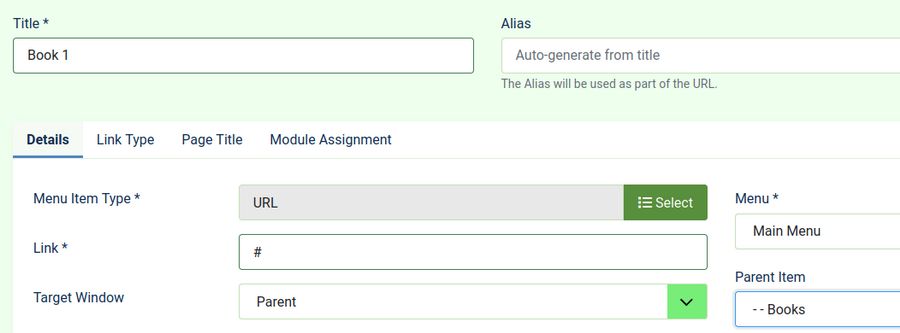
We will next add 9 third level “placeholder” menu items called Book 1, Book 2 Book 3, Clothing 1, Clothing 2, Clothing 3 and Free Stuff 1, 2 and 3. To create our first third level menu item click New. Then click the Select button. Click System Links. Then click URL. For Link, type a hash sign #. For Title, type Book 1. Then to assign this menu item to a parent, on the right column change the parent item to Books.
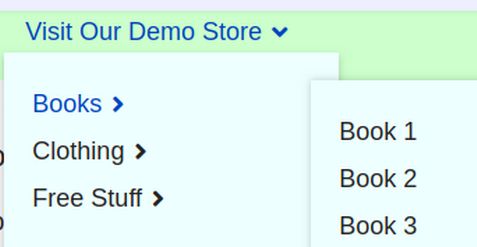
Then click Save and New. Repeat this process for the remaining menu items. Then click Save and Close. Here is what it looks like on the front end:
If you only have a few products, you should stick with the normal top level menu and add a few second level menu items. But if you have so many menu items that you are using third level menu items, then you should consider switching to a Helix Mega Menu.
Step 4 Switch from a Normal Menu to a Mega Menu
The first steps for creating a mega menu are the same as for creating a normal menu. The key difference is that you MUST create second level and third level menu items for the Mega Menu to display properly.
We have already created our Shop top level menu item – with its own second and third level menu items. We therefore can create a mega menu for our Shop top level menu item.
To create your Shop mega menu, click Templates, Styles and click on the Helix template to edit it. Go to Menus and find your Shop top level menu item which in our case is called Visit our Demo Store. Hover to the right of this menu item to see three hidden icons. The first is Edit. The second is delete and the third is Mega Menu:
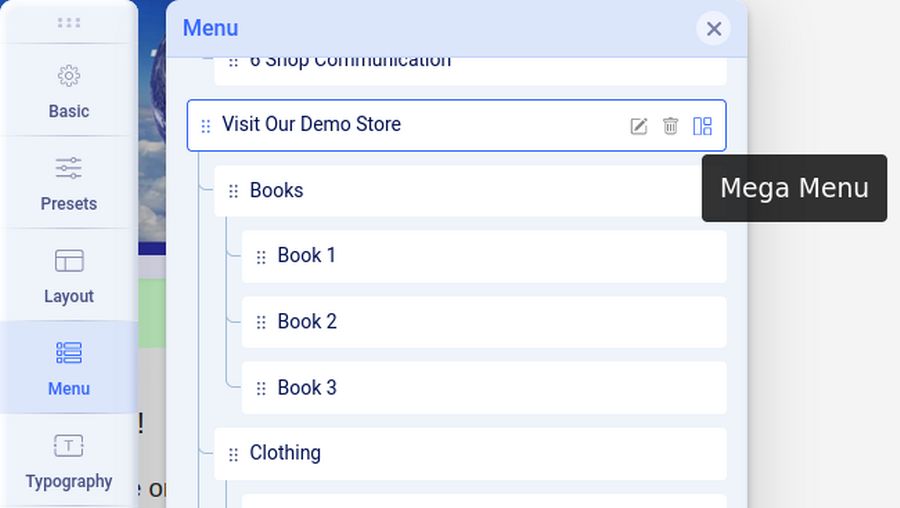
Click on the Mega Menu icon to open it. Then click on the button to the right of the words Mega Menu to open the Mega Menu screen:
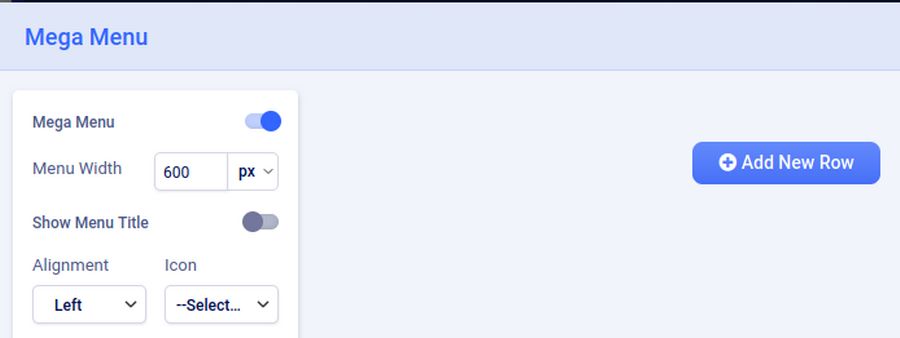
Click Add New Row:
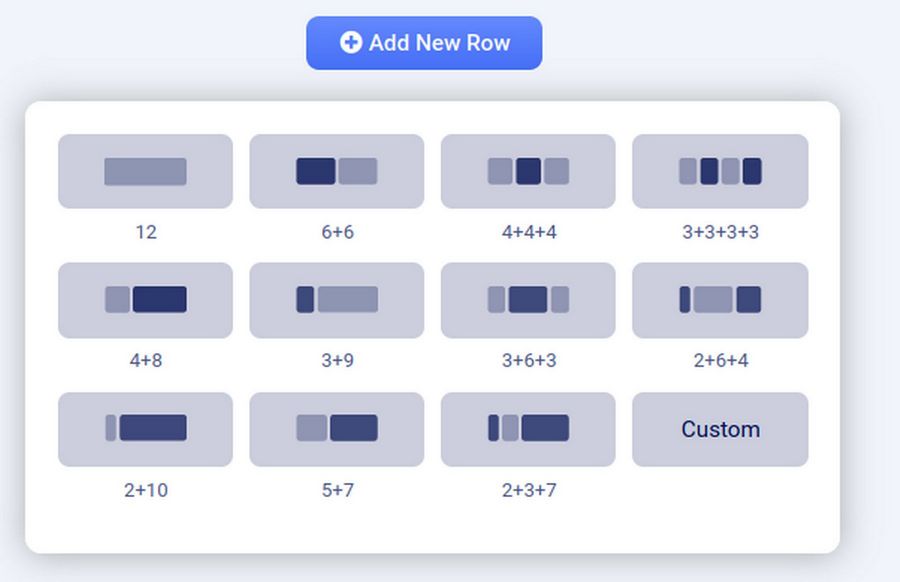
Click 4 + 4 + 4 to create a three column mega menu drop down.
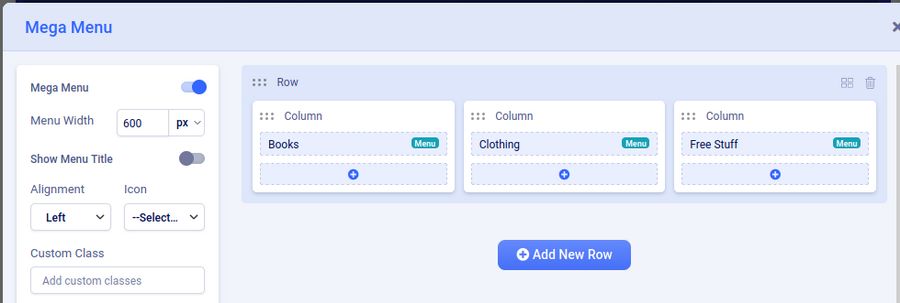
Click Save. Then change the alignment to right. Then click Save and Close. Save and Close the Template Edit screen and view the front end:
Step 5 Replace Placeholder Menu Items with Real Menu Items
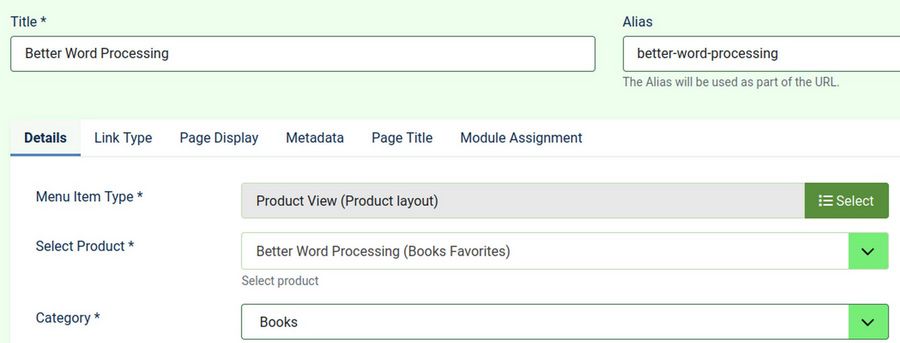
As you create your first product, Book 1, you can click on the Book 1 menu item and replace the title and hash sign with the actual link to your first product. For example, we have previously created a book in the Book category called Better Word Processing. So go to Menus, Main Menu and click on the Book 1 menu item. Then click on Select and change the Menu Item Type from URL to Phoca Cart Product View. Change the title to Better Word Processing and the alias to better-word-processing. Then click Select Product and begin typing the title of the product. Phoca Cart will bring up a list of options. Click on Better Word Processing. This will set the product and its category:
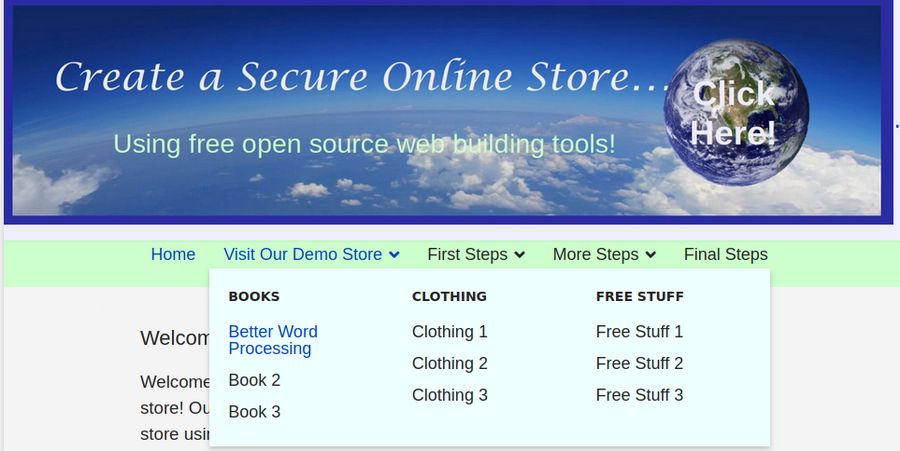
Click Save and Close. Repeat for the remaining products as you create them. Here is the result after adding our real book product:
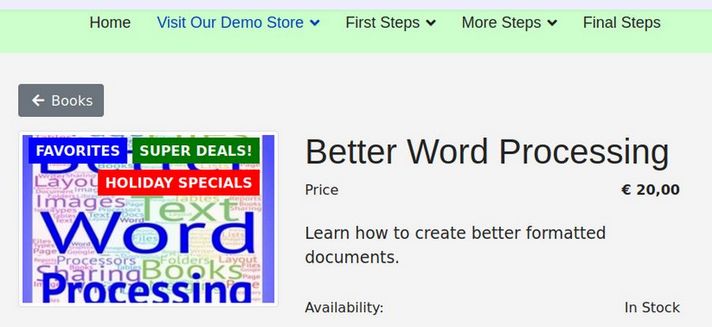
Then click on the menu item to verify that it goes to the correct Product page.
Note that you can click on the top level menu item, Visit our Demo Store at any time to return to the Demo Store home page. But thanks to the mega menu drop down, your customers now have a way to directly access products from the main menu without having to first click on the Demo store home page or the category page.
Step 6 Add a View Cart Menu Item
There is a huge problem with having the View Cart module in the right module position – or even in a module position above the main component. Basically, the View Cart module takes up too much space no matter where you put it. It is therefore much better to create a View Cart Menu item which displays the Shopping Cart when the menu item is clicked. This keeps the cart hidden until needed. However, we do not want the View Cart Menu Item in the Main Menu because we only want it displayed on certain pages. While there is a way to get a Module to only display on certain pages, there is not a way to get a menu item in the Main Menu to only display on certain pages. One solution to this problem is to create a separate Menu and Menu Module for the View Cart Menu Item. We can then set the View Cart Menu Module to only display on certain pages. Here are the steps to create a Shop Menu to hold our View Cart Menu Item.
Create a Module Position for the Shop Menu Module
Before we create a shop menu, we should create a place to put it. To do this, click on Templates, Styles. Then click the Helix template. Click Layout and add a new module row below the Main Menu row:
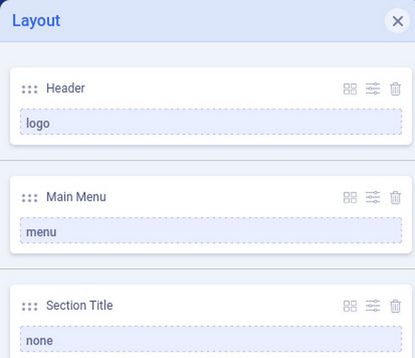
Then click on the arrows and change the name of the row from Section Title to Shop Menu. Then click on Style. For Padding, type 10px and change the background color to #CCFFCC. Then click Apply. Next click on the three dots to the right of the word None and change the module position to top1. Then click Save and Close.
Create a Shop Menu
To create a new menu, click on Menus, Manage, Add New Menu:
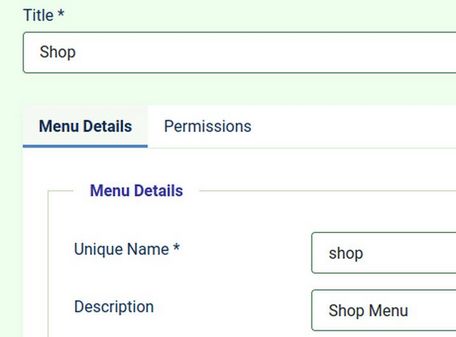
We will call our new menu Shop and give it the type of shop. Add a short description and click Save and Close. This adds our new menu to our list of menus.

Add a Menu Module to Display our New Shop Menu
Click on the green button to add a module we need to display our new menu on our website. Note that a module is just a box of content. This will bring up a Pop Up where we type in a title and assign the module to the Helix top1 module position. This will place our Shop Menu just below our Website header and our Main Menu. Also change Show Title to Hide.
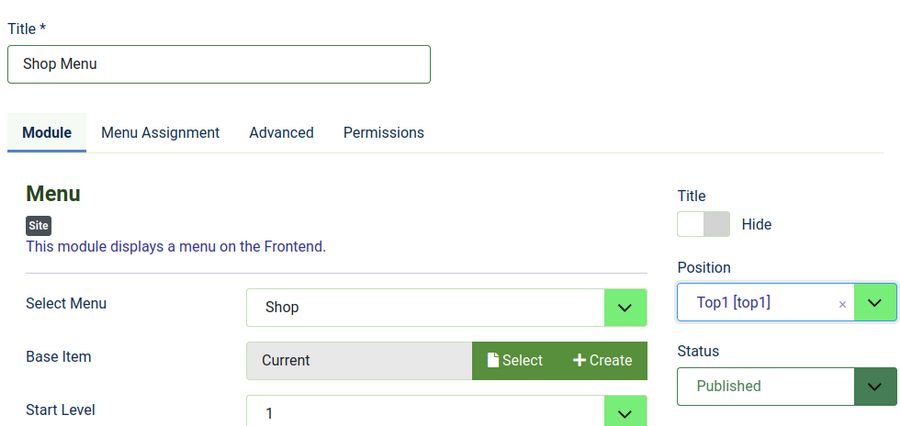
By default, new menus are assigned to all pages. But we only want the menu to appear on shop related pages. So click the Menu Assignment tab. Click only on pages selected. Then click None. Then click Our Demo Store. Then click Save and Close.
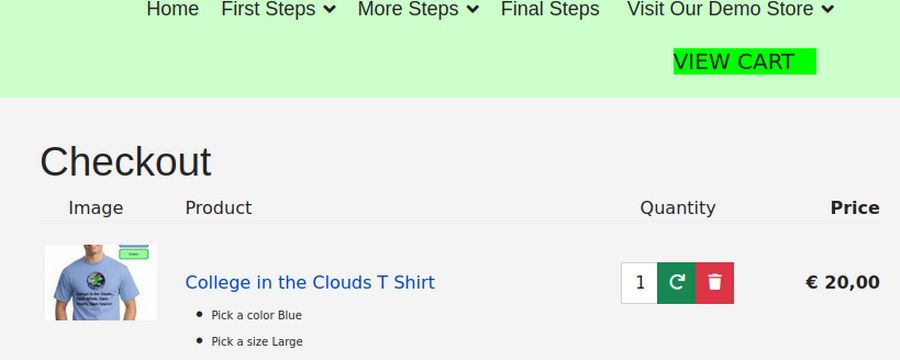
Create a VIEW CART Menu Item
To get the new menu to appear, we need to create at least one menu item for our new Shop menu. Click on Menus, Shop, Create New Menu Item. Then for Menu Item Type, click on the SELECT button.
Then click Phoca Cart, Checkout View. For the Title, type, VIEW CART. Change the Target Window to New Window with Navigation. Click the Link Type tab. For Link Class, type mediumgreen. Then click Save and Close.
Assign the Shop Menu module to all Shop Menu pages
Go to Content, Site Modules and open the Shop menu module. Click on the Menu Assignment tab and change it so that the Shop Menu Module only displays on Shop Categories, Shop Category, Shop Product and View Cart pages. Then click Save and Close.
Unpublish the Your Cart module
Select and unpublish the Your Cart module as it is no longer needed and taking up space in the right sidebar position.
Visit the Shop to Verify the Navigation
Click on Visit our Shop in the Main Menu. This takes you to our shop Home page. Use the Shop Mega Menu to view a product. Then click Add to Cart. Then click View Cart to see the product in the cart.
What’s Next?
This completes our setup of the Helix Mega Menu. In the next article, we will add a separate Shop bottom menu and Shop module menu.