
In this article, we will review Phoca Cart Configuration Options – which is one of the most important areas to set up when starting a new online store.
Phoca Cart Configuration Options are reached by going to the Components, Phoca Cart Control Panel. Then click the OPTIONS button in the upper right corner. This displays a screen with 9 tabs:
While most of these settings can be left at their default values, it can still take some time to review all of these options in order to understand how they affect the content and appearance of your online store. We will not cover every single option. But we will try to explain the most important options.
Options Display Tab
The first tab is called Display. Scroll down the page and you will see that it has been divided into 7 Views followed by a long list of General Display Options followed by Ajax Options and Theme options.
While there are seven View options offered by Phoca Cart , we will focus on the five most important Views (or page layouts) which are:
Categories View- Categories View includes settings that control how all of the categories are displayed on your SHOP HOME page:
Category and Items View (Products View) - This sets the page layout for each of your individual Category pages:

Item View (Product View) - This is the single Product page:
Checkout View – This is the page that displays after a Product has been added to the Cart and after the customer is done shopping and clicks Check Out in the Cart View.
Info View - The “Thank you” page that appears after a customer has completed their purchase of a product.
Here are tips for customizing each of these five views:
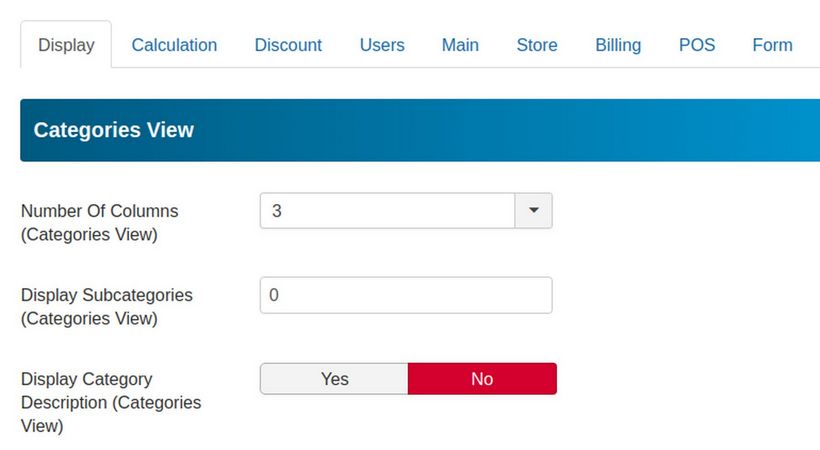
Categories View
Categories View includes settings that control how all of the categories are displayed on your SHOP HOME page:
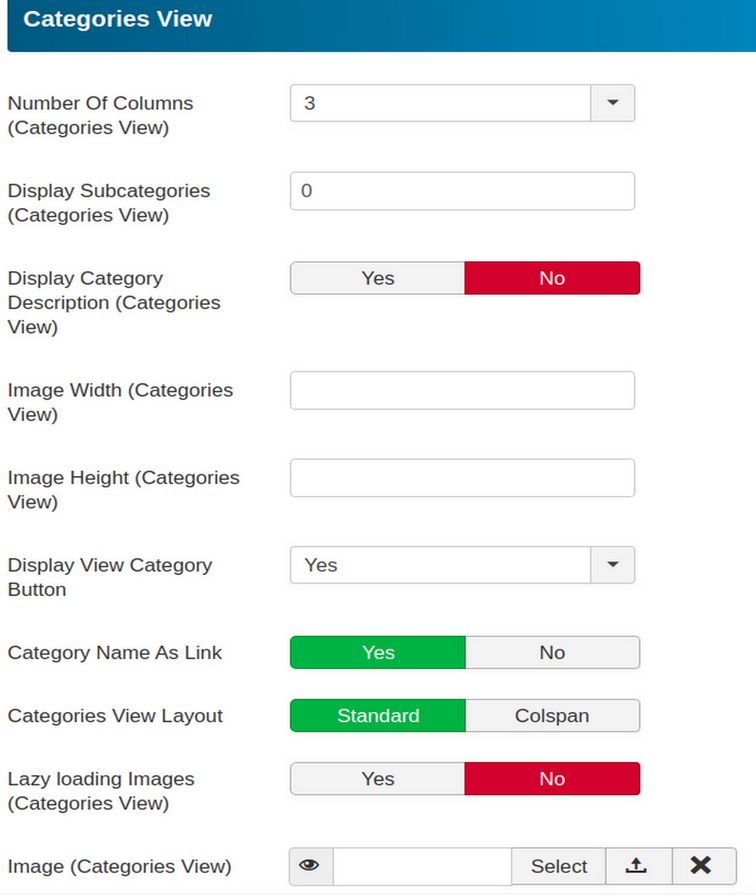
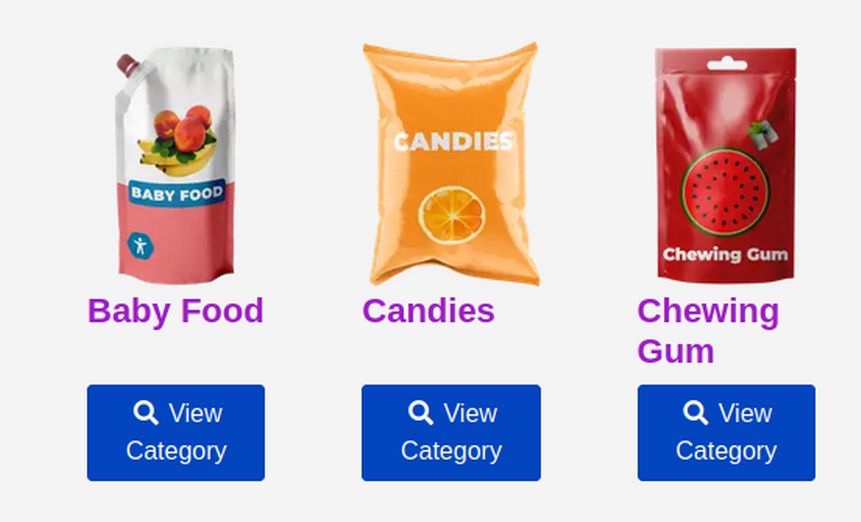
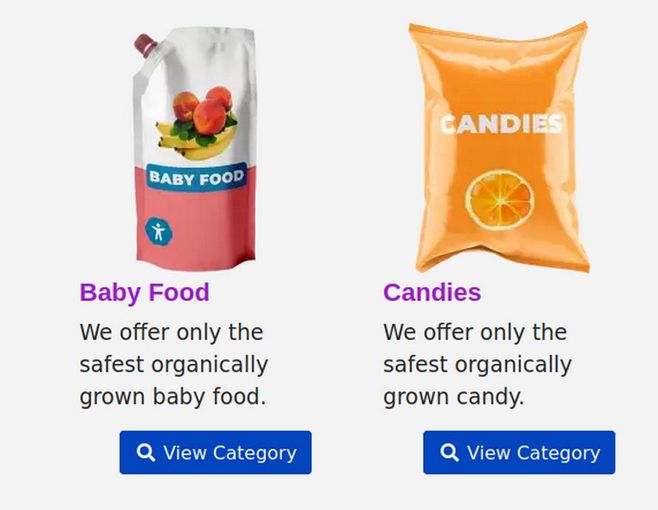
Number of Columns is how many columns of categories appear on your Home page. If you have a lot of categories, you may want to leave it at 3. On the other hand, if you only have a few categories and you want to display a Description for each category, then consider reducing the number of columns to 2 or even 1. Here is what Categories View looks like with the Number of Columns reduced to two and displaying Descriptions for each category:
Display Subcategories by default is set to 0. This means that sub-categories do not appear on your Home page. If you want to display links to sub-categories on your Home page, then set this for the maximum number of sub-categories you are using. Keep in mind that this will only display sub-categories as links so unless you are offering a huge number of categories, you may not want to use sub categories.
Display Category Description. Default is No. Leave it this way if you have a lot of categories to display on your SHOP Home page. But if you only have a few categories, then change this option to Yes and add a one sentence description for each category.
Image Width. Default is blank meaning the image can have any width. Generally, you do not want to set image width – only image height. Best to leave this set for blank.
Image Height. Default is blank. You may want to set this. But it is generally best to leave this blank assuming that you will be letting Phoca Cart automatically generate your Thumbnails and thus all images will be at the same height anyway. (The automatic thumbnail settings can be changed in the Main tab).
Display View Category button. This should always be left at Yes.
Category Name as Link. This should also be changed to Yes.
Categories View Layout. There are two options. These are Default View and Column Span View. The Column Span View option does not work with the Helix Template. So leave this set for Default View.
Image (Categories View) This is the image for the Shop Home Page all categories view. You generally do not want or need an image here.
Category and Items View (Products View)
This sets the page layout for each of your individual Category pages.
Number of Columns sets the number of columns for the products displayed on Category pages. 3 columns is best if you have lots of products. 1 or 2 is better if you only have a few products in each category.
Display Subcategories Default is 0. Change this to the maximum number of sub-categories you are using.
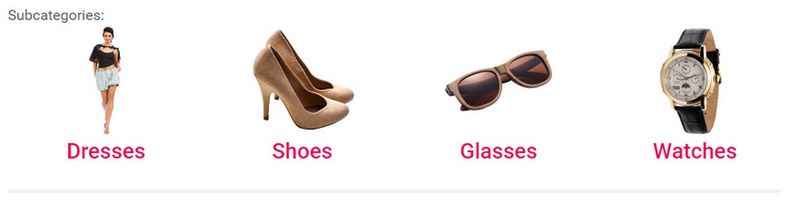
Subcategory Layout. Lists is default. This just displays sub-categories as links – which contain no images and is not visually appealing. Try changing to Image Boxes which looks like this:
Number of Columns Subcategories. Default is 3. But this only matters if you have the Subcategory Layout set for Image Boxes.
Display Description Set to no if you have lots of products and yes if you only have a few products.
Display Product Header h3 is default and is usually your best option. But if you have lots of products and need smaller font size, then try changing this to h4, h5 or h6.
Add to Cart – Displays the Add to Cart button with products shown on the Category page. Yes standard is default and usually your best option – unless you have a lot of products and only want the Add to Cart button displayed on the individual Product pages.
Hide Product Attributes – Default is yes. But if you only have a few products in each category, consider changing this to No.
Product Ordering – Ordering Ascending is default. This means you control the order of appears by where the Product appears in your Phoca Cart Products Table. There are many other options such as Least to Most Expensive.
Product Ordering Values – Leave this alone.
Display Pagination (Category, Items View) This is used if you have so many products in a category that they take up more than one page. Default is Yes. But if you only have a few products, change this to No. Also change the next five parameters from Yes to Hide.
Display Layout (Category Items View) – The options are Grid, Grid List and List. Grid List has the largest image – but also displays the fewest products on the screen. List displays the most products but has the smallest product images. Grid is the most common option.
Display Switch Layout Type – If you want to allow customers to choose between three layout options on the Category page, leave this set for Yes. But because this can make your page appear more complex than it needs to be, consider changing this to No and then using only the Default Layout – which you set.
Display Star Rating – Default is no. Change to Yes if you want registered customers to be able to give ratings and reviews to products.
Product Name as Link Default is no. I recommend changing to Yes.
Join Tag and Label Filter Change from No to Yes.
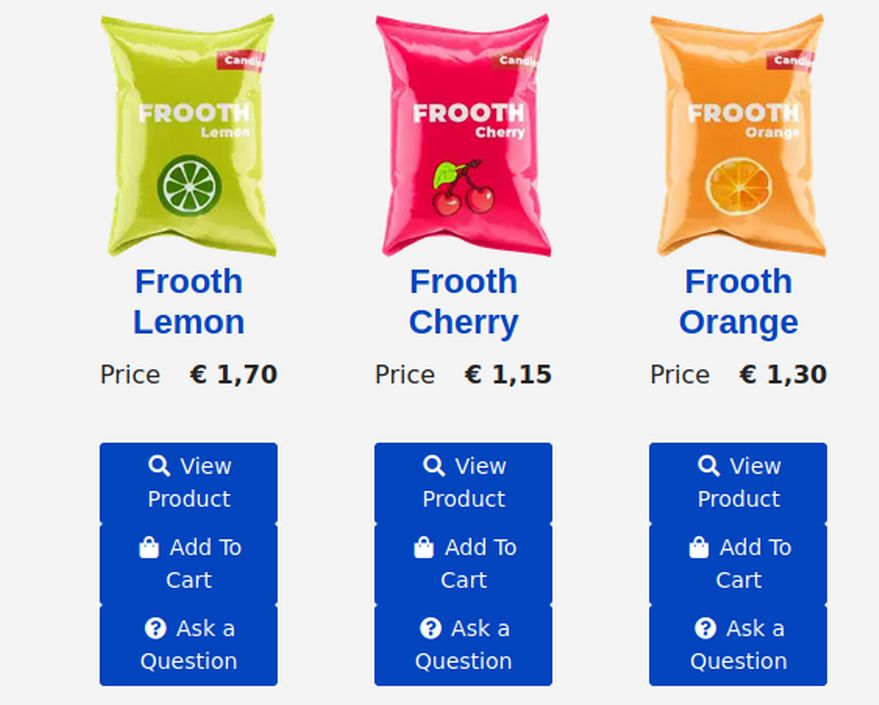
Add a Question Button. Default is No. If you are willing to answer questions, then definitely change this to Yes. Here is what the Ask a Question button looks like in Grid View:
Unfortunately, clicking on Ask A Question button takes your customer to a blank page unless you have gone to the Forms tab and set Ask a Question to Yes. Change Display phone number in form from yes to no. Then select a User to send the Ask a Question form submissions to. Then fill out a test question and see if it works. If it does not work, try turning off the security check which we have not set up yet.
Display Labels (Category Items View) – Set this to Yes (Tags and Labels). We will review how to create Product tags and labels in Chapter 4 Shop Processes.
Display Tags (Category, Items View) - Set this to Yes
Image (Items View) it is generally best to leave this blank.
Item View (Product View) - This is the single Product page.
Add to Cart – leave it set for Yes (Standard)
Hide Product Attributes – Leave it set for No. We will cover Product Attributes in Chapter 4 – Shop Processes. Attributes add selection boxes for sizes and colors.
Display Navigation – Default is No.
Tags (Links) – default is no. I recommend leaving it at No.
Display Labels – default is Yes (Tags and Labels).
Display Tags – Item View – default is Yes.
Display Parameters – Parameters are like tags but are displayed below the Product Specification Tabs area. Also Parameters can not be linked to Categories and therefore can not be displayed in the side menu with a Category Module. Sadly, this means that parameters might not even be seen. We therefore will not use Parameters.
Ask a Question (Item View) – Change this from No to Yes.
Display Size Options - Change from No to Yes.
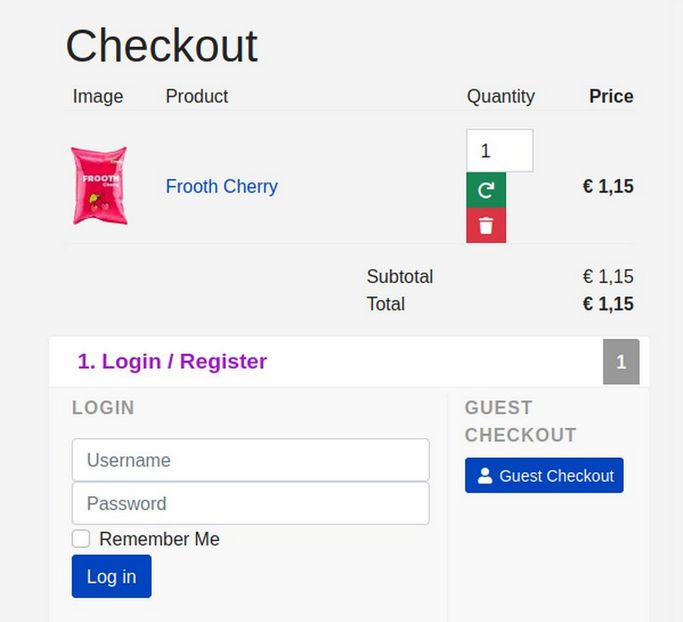
Checkout View – This is the page that displays after a Product has been added to the Cart and after the customer is done shopping and clicks Check Out in the Cart View.
Display Discount Price – change from yes to no.
Enable Captcha in Checkout – This is best set to Guests Only as Registered Members have already passed the Captcha test.
Note that Adding the Guest Checkout option is set in the Users tab rather than in this Display tab.
Info View – This feature allows you to control the content that appears on the Info View page which is the page that appears after a customer has completed their purchase of a product. By default, this page historically has just said, Thank you for buying this product. You can create a Joomla article with an image and instructions on how to return to the Home page, how to sign up for the store newsletter or whatever additional information you want on this page.
General Display Options
Main Description – This allows you to create a Joomla article called Welcome to our Store and place it at the top of the Phoca Cart Categories page. End the article with the advice: Choose from the following categories of products: - as the categories of products are displayed immediately after the Welcome article.
Here is an example Welcome article:
Welcome to our Phoca Cart Demo Store!
The goal of our Phoca Cart Demo Store is to help you set up your own online store using Joomla and Phoca Cart.
This top section was added to the Store Home page of our Phoca Shop store by creating a normal Joomla article and then placing the article at the top of the Phoca Cart component by going to Phoca Cart Control Panel, Options, General Display Options, Main Description.
Below this main Store Description section is a section showing our Demo Product Categories. This is followed by an optional section using the Phoca Cart Products module showing a few featured products. It could alternately show any of several categories of products:
Choose from the following categories of products:
First upload the image to your Joomla Media folder. Then create the article with Content, Articles, New. Then go to Phoca Cart Options and select the Welcome to our Store article you just created.
Interactive Change (Image) – set to Yes if you have created different images for different colors of products. When a customer changes the color attribute, the image of the product changes to the new color.
Display Hot Icon – Leave set for 0 as we will use Labels and Tags to give us more control over this item.
Display Featured Text – If you want to assign Featured Products in the main product edit screen, then type in Featured! here. But if you would rather use Labels and Tags to define featured products, then leave this box empty.
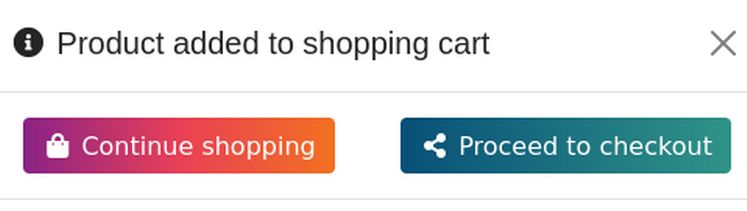
Ajax Options – change Add to Cart Method to Ajax with Popup Window. This will display the following popup after an item has been added to the Shopping Cart:
Theme Options – change Load specific CSS to Helix .
USERS TAB
Guest Checkout – Change from No to Yes.
MAIN TAB
Images and Thumbnails – Here is where you can change the size of image thumbnails.
Remove IDs from URLs – change from No to Yes to have shorter and more friendly URLs.
STORE TAB
Store Title: Type in the name of your store.
Display Checkout Terms and Conditions Checkbox = Change from Yes Require to No if you want to simplify the checkout process. Otherwise create a custom Joomla article and select it.
Display Checkout Newsletter Checkbox – Change from No to Yes and add an article if you want to give customers the option of signing up for your store newsletter.
BILLING TAB - Scroll down to Order ID Length (Order Number) and change the Order number from 10 to 5. Also change the Order ID Length Receipt Number from 10 to 5. Also change the Order ID Length Invoice Number from 10 to 5. Also change the Order ID Length Payment Reference Number from 10 to 5.
FORM TAB - Scroll down to the Security Options and enter ReCaptcha Site key and Private key to activate Invisible Captcha. We will hopefully come up with an option better than using Recaptcha.
Newsletter Options – need to be set if using Phoca Newsletter component.
When you are done setting all of your Configuration Options, click Save and Close to return to the main Phoca Cart Control Panel.
Move “Powered by Phoca Cart” from the top to the bottom of the Shop pages
At the top of Phoca Cart pages is a link to the phoca dot cz website with the words “Powered by Phoca Cart”. The problem with having this link at the top of the page is that we have previously decreased the page with in order to make the page text easier to read and to allow side by side editing with two windows open at the same time. The Powered by Phoca Cart text further reduces the width of our pages.
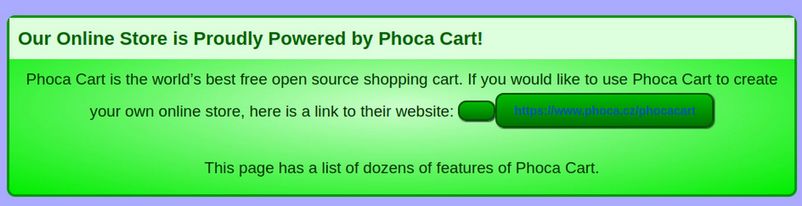
Giving what a useful tool Phoca Cart is, it is important to promote Phoca Cart by retaining this link. However, we should move it from the top of the page to a module in the footer of the page. We will first create a new custom module with this title:
Our Online Store is Proudly Powered by Phoca Cart!
Copy paste this text into the JCE editor:
Phoca Cart is the world’s best free open source shopping cart. If you would like to use Phoca Cart to create your own online store, here is a link to their website: https://www.phoca.cz/phocacart
This page has a list of dozens of features of Phoca Cart.
Then assign the module to the Helix footer position and assign the page to the Our Demo Store page. Assuming you have downloaded our custom dot css file, you can click on the Advanced tab and add a module class suffix to this module. Then click Save and view the result.
Then to hide the Powered by Phoca Cart link at the top of the Shop Home (Categories) page, go to Template, Code, Helix and click the tab called Create Overrides. In the Components box, click com_phocacart. Then click categories. Joomla will reply:
Override created in /templates/shaper_helixultimate/html/com_phocacart/categories
Click on the Editor tab. Then click the html folder to open it. Then click the phocacart folder to open it. Then click the categories folder to open it. There are three files. Open default.php and scroll down to line 32 and delete
echo PhocacartUtilsInfo::getInfo();
Repeat with overrides for category default.php line 509
and product (item) default.php line 1033
and checkout default.php delete line 77
and Info default.php line 120
and account default.php line 152.
Then view your Shop to confirm that the Powered by links have been removed from the top of these pages.
What’s Next?
This finishes our Shop Configuration Options. In the next article, we will review how to set up Shop Categories.