
In our previous two articles, we explained how to create and configure a Linux computer. In this article, we will summarize how to use your secure Linux computer to create your own secure Debian VPS and then install the Hestia Control Panel on it.
Step 1 Register at Canhost
I have written a detailed article explaining why I recommend Canhost to host your VPS. Here is a link to this article:
https://createasecurewebsite.com/first-steps/2-create-a-secure-vps/2-1-choose-a-secure-vps-host
To register for an account, go to the Canhost Home page: https://www.canhost.ca/
Click Log In in the top menu. Then click Sign Up.
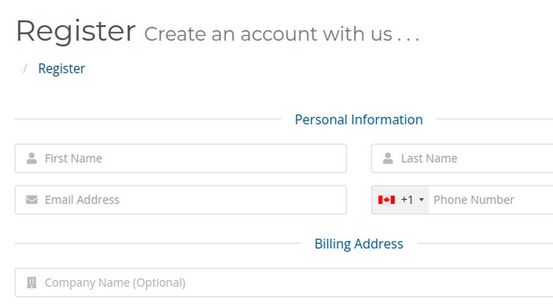
Use a secure Protonmail email address. Also use a password that is at least 10 digits long with at least one capital letter, one lower case letter, one digit and one special character.
Step 2 Get a new domain name hosted by CanHost to use for your VPS name server
Alternately you can transfer a domain name to Canhost. However, because the domain name should be directed to CanHost servers, you will also need to transfer the files and database to CanHost if you want to use an existing domain name. This creates a Chicken and Egg problem because we really want to transfer the files and databases of existing websites AFTER setting up our Hestia Control Panel. Your domain name should point to the Canhost servers.
Eventually, you should transfer all of your domain names to Canhost in order to use the Canhost DNS Manager to point these domain names to your Canhost VPS.
Step 3 Order a Debian 11 VPS with at least 4 GB of RAM
From the Canhost Home page, click Hosting, Canadian VPS. Then click VPS EXPRESS 1. Increase Amount of RAM from 2 GB to 4 GB.
Change the Operating System from Centos to Debian 11. Change Control Panel from cPanel to No Control Panel. The monthly fee for this VPS is $18 US Dollars. The DISC space is 20 GB. But because 10 GB will be taken up with Debian, Hestia and other programs, this leaves only 10 useable GB. Consider increasing the Disc Space to 30 GB which will increase the useable GB to 20 GB.
For Hostname, type ns1.yourdomain.com where yourdomain.com is a domain name pointing at the default canhost servers. Use a password has at least 10 digits long with at least one capital letter, one lower case letter, one digit and one special character. For System Username, use a name with lowercase letters and no spaces.
Write down your VPS username and password as you will need both to log into your VPS server! Leave the SSH box blank. Then click Continue. Pay for the VPS and wait a few hours. You will get an email letting you know your two custom VPS IP addresses.
Once you have received your VPS confirmation email, log into your Canhost account and click on Client Area, Services.
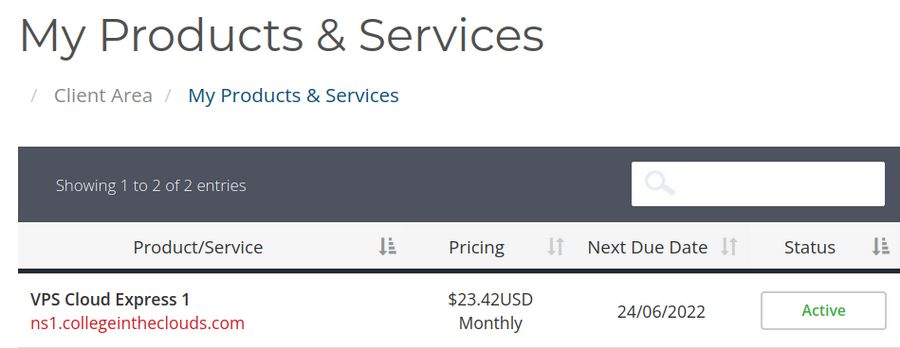
Click on the word Active to view the VPS summary. The Server Hostname should read ns1.yourdomain.com. This is your server Fully Qualified Domain Name (FQDN) we will use when installing the Hestia Control Panel. Below the FQDN is your primary IP address we will use to SSH into your VPS after we have changed the DNS records. Below this is the Reinstall Icon you can use if you make a mistake and need to start over.
Step 4 Change your server domain name DNS Records
Log into your Canhost account and click My DNS. Then click on the Edit button to the right of your server domain name to view your domain name DNS records.
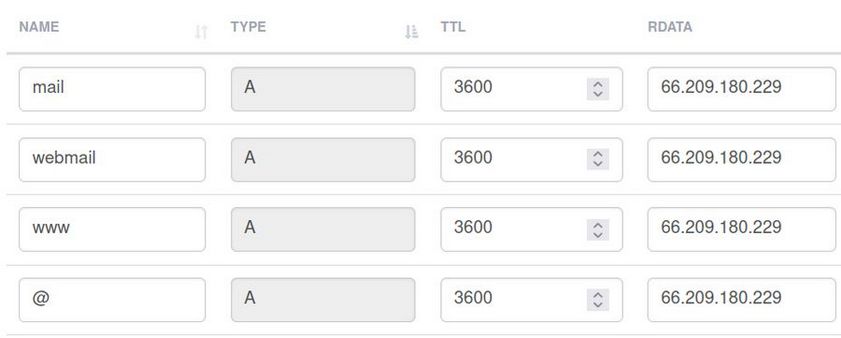
Change the IP addresses of the first four A Records
At the top of the Records table, there are four A records which all point to the Canhost IP address. Fully delete the Canhost IP addresses. Then copy paste your primary IP address in all four boxes. Then click Save and the bottom of the screen.
Create A records for ns1 and ns2
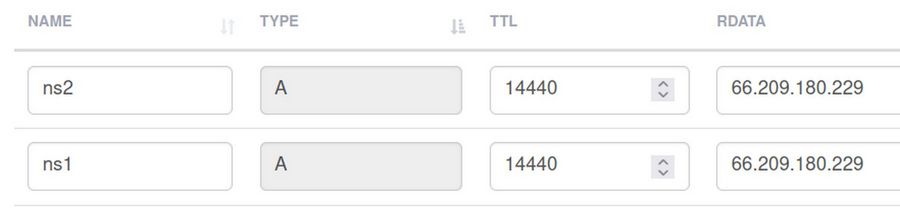
ns1 and ns2 are sub domains of our primary domain. For example, if your domain is example.com and you want to name your server ns1.example.com, then create the A record for ns1 in the example.com DNS zone pointing to your VPS primary IP address. To create an A Record, click Create Record. Then change the record type to an A record and type ns1 for the name.
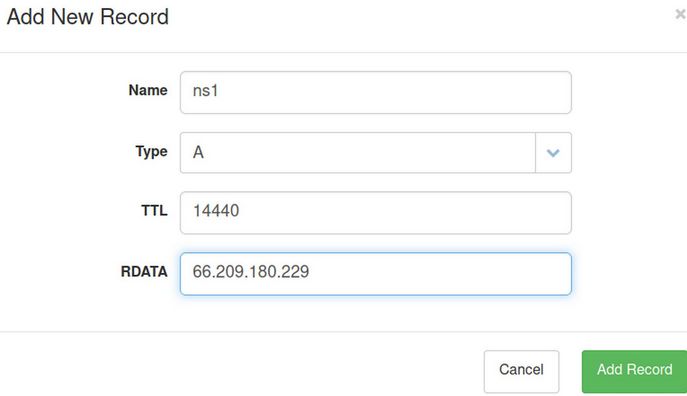
Copy paste your VPS Primary IP address and put it in the RDATA box. Then save and close the file and repeat to create an A record for the sub domain ns2.
Create two CAA records
Create CAA records by clicking on Add Record. Use the Type drop down arrow to choose CAA.
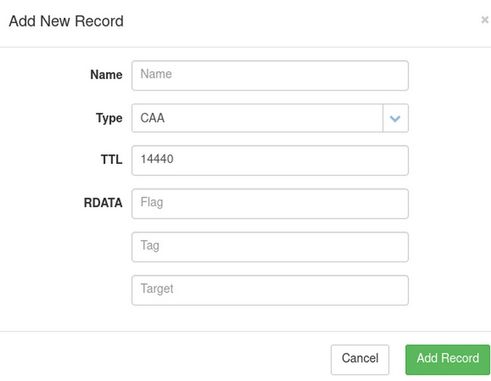
Then type your domain name such as mywebsite.com into the Name box. Type the number 0 into the Flag box and the word issue into the Tag box. Then type the domain name letsencrypt.org into the Target box. Then click Add Record. Then click Add Record again and create a second CAA record with the Tag issuewild.
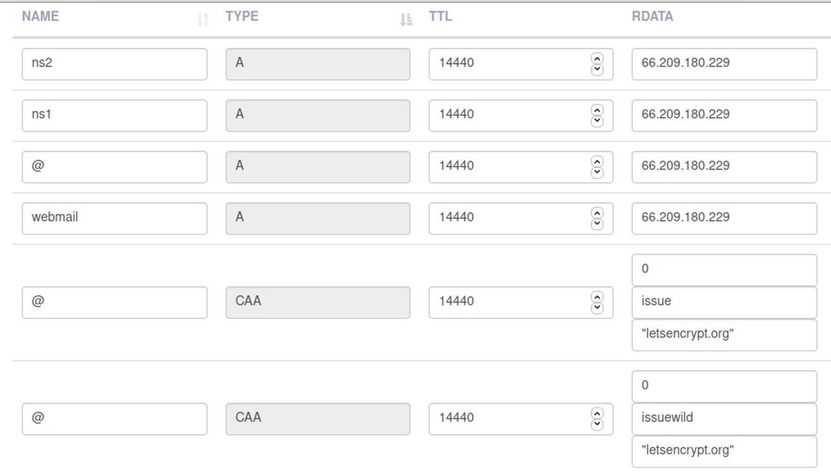
Here are my records for my domain name collegeintheclouds dot com. Note that there are A records for ns1 and ns2. that point to my primary IP address. Also there are two CAA records:
Leave the Canhost DNS records at the bottom of the DNS Records Table:
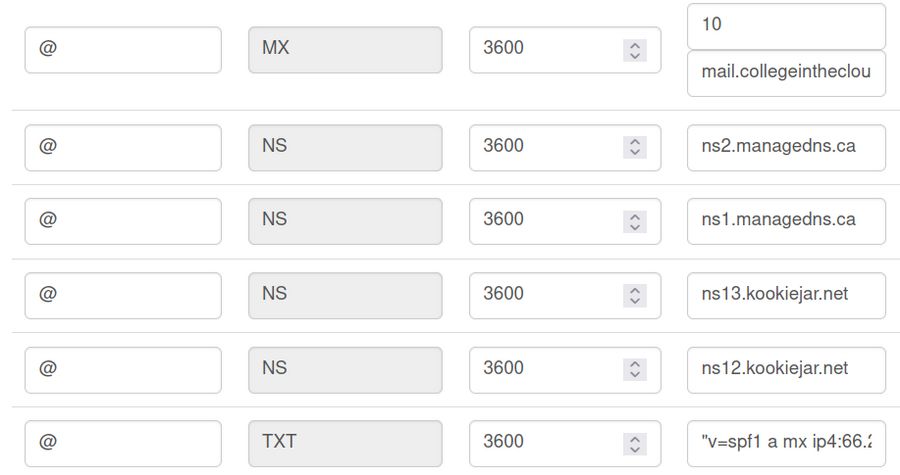
Then click Save at the bottom of the DNS Zone Records table to save these changes.
DNS Summary… Why you should not register your Private Nameserver
Log into your Canhost account and click Client Area, Domains. Then to the right of the domain name you are using for your name server, click on the Wrench. Then click Manage Domain. In the left side menu is a menu item called Private Nameservers. Click on this menu item to bring up a form where you can register your name server simply by typing in the Nameserver name and IP address.
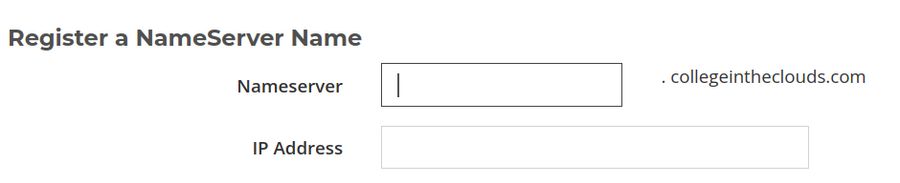
Registering your nameserver may seem like a good idea as it means you can change the nameservers you are using from the default Canhost nameservers to your own custom nameservers.
However, there is a serious drawback in registering your own private name server and then pointing your domains to your own private name server. The drawback is that you will need to set up your own DNS server to handle the DNS records for these domains.
Setting up a DNS server is a complicated process and is generally not worth your time and effort in learning how to do this. While I think there is a significant security benefit in creating your own Virtual Private Server, there is no real benefit in setting up your own DNS routing server.
I therefore recommend that you not register your Private Nameserver unless you are willing to take the time needed to learn how to properly set up your own DNS server – a subject that is beyond the scope of this course.
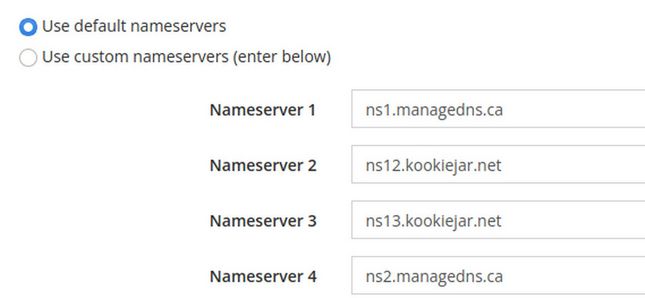
Instead, I recommend that you use the 4 default Canhost Nameservers (aka ns1.managedns.ca).
This means you should also not change the nameserver records at the bottom of your My DNS table:
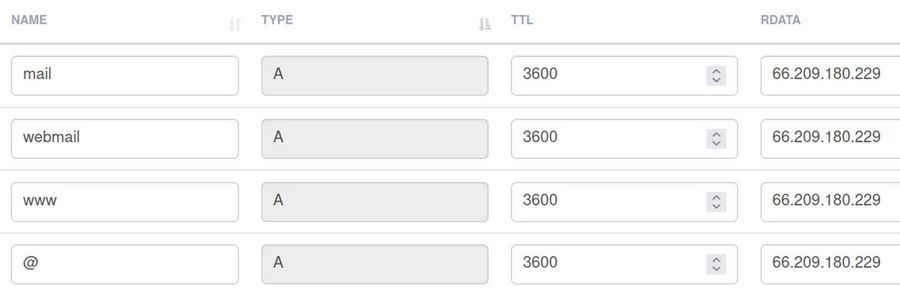
However, you should use Canhost My DNS to edit the first four A Records to point your domain names at your primary IP address instead of the default Canhost IP addresses.
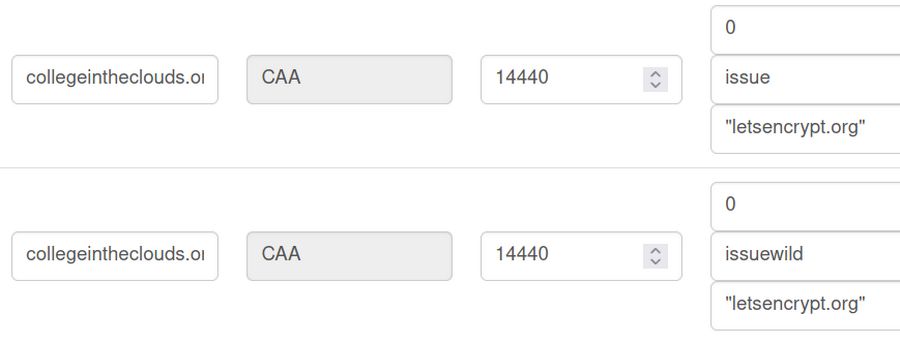
And you should create two CAA records for each of your domain names:
You should also create A records for each of your nameserver sub domains in the DNS records for the domain name you are using for your server (note that these two special A records are not needed for any other domain names you will be using):
Once you have completed these changes to your Canhost DNS settings, you are ready to log out of your Canhost account and log into your Hestia VPS Control Panel and create a new Hestia User account which you will use to add your domain name and website.
Step 5: SSH into your VPS from your home computer terminal
Open a terminal on your home computer. Use the Primary IP address given to you by Canhost in their email to SSH into your new server from our home computer terminal with this command:
ssh yourusername@yourIPaddress>
Example: ssh
Press Enter. Then type yes to accept the SSH connection. Then enter your VPS password and press Enter. Your terminal screen should then display the line that looks something like david at ns1. This means you are logged into your Debian VPS and can begin to edit its settings.
Step 6: Create a Root User and Password
We need to create a Root User in order to install the Hestia Control Panel. However, we need to change the SSH configuration file before we can create a root user. Once logged into your user SSH session, copy paste:
sudo nano /etc/ssh/sshd_config
to open the ssh configuration file. Use the down arrow to scroll down to PermitRootLogin. Delete the hash at the beginning of the line PermitRootLogin and set the value to yes:
PermitRootLogin yes
Save this file by pressing the Control key and the lower case o key at the same time, followed by pressing the Enter key. Close the file by pressing Control plus the x key at the same time. To make the new setting take effect, restart the ssh service:
sudo systemctl restart sshd.service
While VPS is running, and still in your user ssh session, copy paste the following into the ssh terminal: sudo passwd root
Enter your sudo user password. Then add a root password typing it twice. Reply should be: passwd: password updated successfully
Then log out of the user SSH session with exit. Then close the home terminal.
Step 7 SSH into your VPS as the root user
SSH into your VPS from your home computer terminal with this command:
For example, ssh
When prompted for the password, use the root password you just created. Once logged in as the root user, uninstall the Canhost firewall called CSF with these commands:
cd /etc/csf
Press enter, then copy paste:
sh uninstall.sh
Then press Enter again. Go back to root with
cd /
Next, install the Midnight Commander graphical file manager with this command:
apt install mc
Midnight Commander is a graphical file manager that makes it easier to edit and move files in our VPS. We will use Midnight Commander to change some settings after we install Hestia.
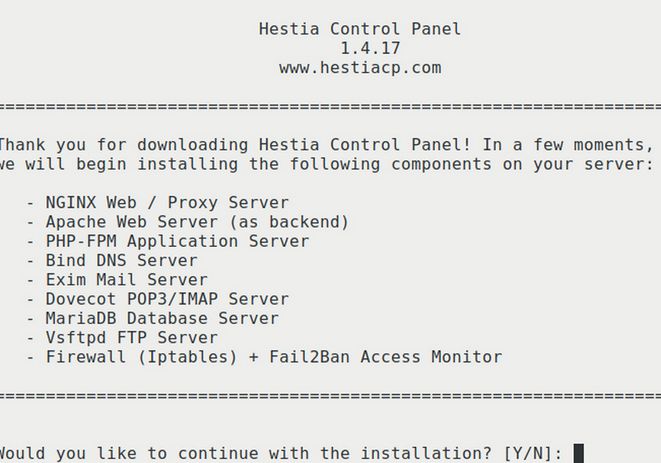
Step 8 Install the Hestia Control Panel to your VPS
While logged in as root, copy and paste the following commands:
apt-get update
apt-get upgrade
Then open a browser and go to the Hestia control panel home page. https://hestiacp.com/
Step 3 on the Hestia Home page shows the normal install command:
wget https://raw.githubusercontent.com/hestiacp/hestiacp/release/install/hst-install.sh
Copy paste this into the ssh root terminal and press Enter. The above command is normally followed by bash hst-install.sh
However, we do not want clamav because it does very little and uses way too much ram. To avoid installing clamav, we will use this for the second command: bash hst-install.sh --clamav no
Then type Y. Then type your email and FQDN:

Then press Enter. After the installer finishes, it will end with Press any key to continue. Do not press any key! First, scroll up the page and copy paste the Hestia URL and password!!!
Admin URL: https://76.28.214.202:8083
Username: admin Password: ImQwmOHv1rg1Yi9g
Then scroll back down the page and press Enter. Then close the terminal. The server will restart. You do not need to log into the server. Instead, open a browser and copy paste the Hestia URL: https://76.28.214.202:8083
You can also log in with the domain name:port number
ns1.example.com:8083
Either way, Firefox will state: Warning: Potential Security Risk Ahead. Click Advanced. Then click Accept Risk and Continue. The Hestia Control Panel Log in screen will appear:
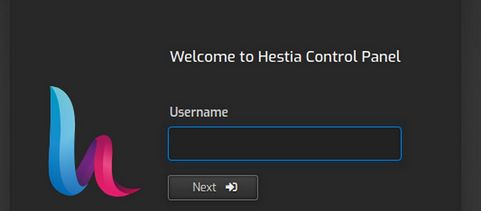
For username, type admin. Then click Next. For password, copy and paste the complex password: ImQwmOHv1rg1Yi9g
Step 9 Change the Background Color of the Panel
The dark panel is hard to read and hard to see on screenshots. Therefore, our first task is to change the background color of the panel to a lighter color. Click on the Settings wheel in the upper right corner. Then click Configure on the left side of the screen.
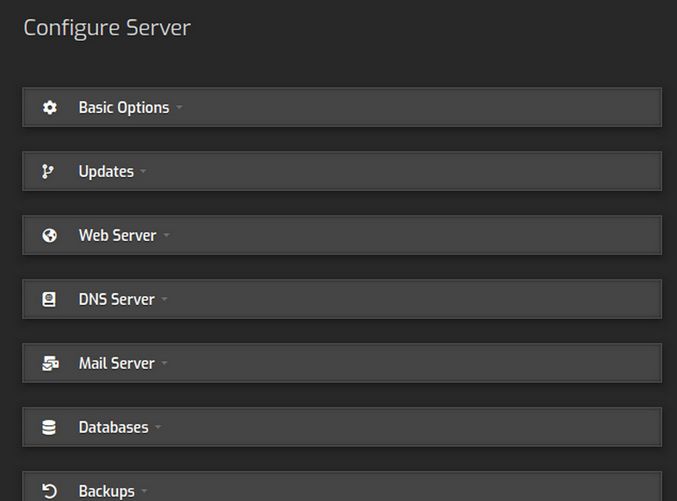
Then click Basic Options. Then use the Appearance drop down arrow to change from dark to default and click Save. Then click on the word Back to return to the main panel Settings screen.
Step 10 Change the Admin Password
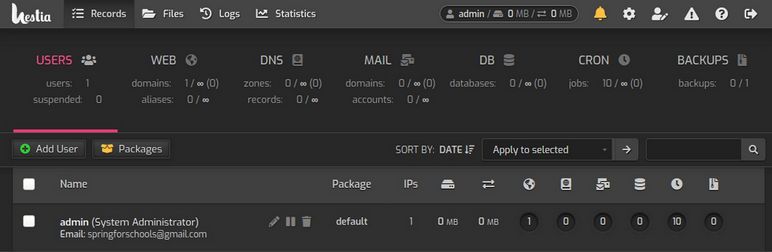
Click on Users in the top menu.
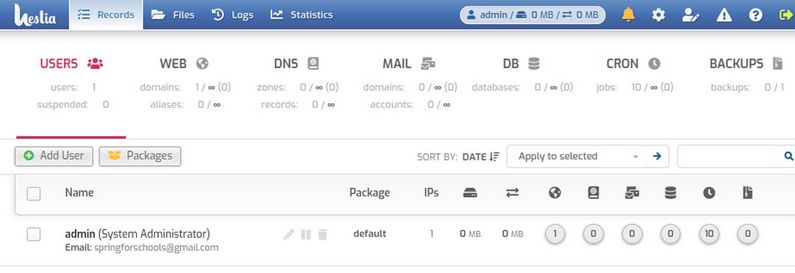
Then select the Admin User and click the Edit pencil. Type in an easier to remember password. Each Hestia password must be at least 8 characters long with 1 uppercase & 1 lowercase character and 1 number. Then click Save and Back to go back to the User screen.
What’s Next?
Now that we have installed the Hestia Control Panel on our Debian VPS, in the next article, we will learn how to use Midnight Commander to change some settings on our Hestia Control Panel.